


How to Replace Front Turn Signal Bulbs on a 2018 Hyundai Kona (LED vs Bulb Check)
Step-by-step instructions, required tools and parts, safety tips, and post-repair testing
How to Replace Front Turn Signal Bulbs on a 2018 Hyundai Kona (LED vs Bulb Check)
Step-by-step instructions, required tools and parts, safety tips, and post-repair testing


🔧 Kona - Front Turn Signal Bulb Replacement
Your Kona’s front turn signal bulb sits in the back of the headlamp housing. The job is usually done from under the hood by removing the bulb socket, swapping the bulb, and reinstalling everything.
One quick check first: on some Kona headlamp versions the front turn signal is an LED module (no replaceable “bulb”). If you don’t see a removable twist-lock bulb socket behind the headlamp, it’s likely LED and the headlamp assembly is the service part.
Difficulty Level: Beginner | Estimated Time: 0.5–1.0 hours
⚠️ Safety & Precautions
- ⚠️ Turn the lights OFF, remove the key, and let the headlamp cool before touching it.
- ⚠️ Do not touch the new bulb glass with bare fingers (skin oil can shorten bulb life).
- ⚠️ If you must reach near the cooling fan area, keep hands/tools clear (fans can start unexpectedly).
- 🔋 Battery disconnect is not required for this bulb swap.
🔧 Required Tools
You'll need the following tools for this repair:
- Nitrile gloves
- Safety glasses
- Flashlight
- Trim clip removal tool
- Small flathead screwdriver
🔩 Required Parts
HowToo sells all the parts you need for this repair:
- Front turn signal bulb (amber) - Qty: 2
📋 Before You Begin
- Park on level ground and set the parking brake.
- Turn the headlight switch to OFF and remove the key.
- Open the hood and have your flashlight ready so you can see behind the headlamp.
🔨 Step-by-Step Instructions
Follow these steps in order:
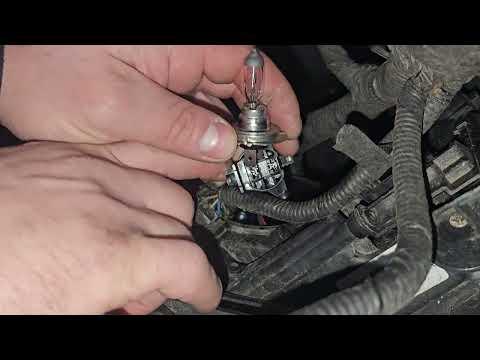
Step 1: Confirm it’s a replaceable bulb
- Use a flashlight and look behind the headlamp assembly (from under the hood).
- Look for a round twist-lock socket with wires going to it (this is the “bulb socket,” a plastic holder that locks into the headlamp).
- If you do not see any twist-lock socket for the turn signal, tell me what you see (or upload a photo) and I’ll confirm whether your Kona uses an LED turn signal module.
Step 2: Create a little working room (only if needed)
- If a plastic air guide/cover is blocking your hand, use a trim clip removal tool to pop up the center of the plastic clips, then remove the clips.
- If a clip is stubborn, gently help it with a small flathead screwdriver. Work slowly to avoid breaking clips.
Step 3: Remove the turn signal bulb socket
- Put on nitrile gloves.
- Grip the turn signal socket and twist it counterclockwise (left) by hand, then pull it straight out of the headlamp.
- If it won’t move, re-grip and try again—don’t use pliers (they can crack the socket).
Step 4: Remove the old bulb from the socket
- Hold the socket firmly and pull the old bulb straight out (most are pull-to-remove).
- If it’s tight, gently wiggle while pulling—do not twist hard unless your bulb clearly uses a twist-lock base.
Step 5: Install the new bulb
- Still wearing nitrile gloves, push the new bulb straight into the socket until fully seated.
- If you accidentally touch the glass, wipe it clean and dry before installing.
Step 6: Reinstall the socket
- Insert the socket back into the headlamp opening.
- Twist clockwise (right) by hand until it locks. It should feel fully seated and not wobble.
Step 7: Reinstall any air guide/cover clips you removed
- Reinstall the plastic clips by pushing the clip body in first, then press the center pin down flush.
✅ After Repair
- Turn the ignition to ON and test the left and right turn signals.
- Turn on the hazard lights and walk around to confirm both front turn signals flash at the same speed.
- If the turn signal blinks fast, the bulb may be the wrong type or not seated fully—recheck the connection.
💰 DIY vs Shop Cost
Shop Cost: $80-$160 (parts + labor)
DIY Cost: $10-$40 (parts only)
You Save: $40-$150 by doing it yourself!
Shop labor rates vary but typically run $100-$150/hour. This repair takes a shop approximately 0.3-0.7 hours.
🎯 Ready to get started?
HowToo makes it easy: same-day/2-day shipping on every part, plus all the tools and specialty tools you need! Check out the parts and tools sections below to add everything to your cart.
