


How to Replace Front Struts & Rear Shocks on a 2018 Acura MDX (DIY Guide)
Step-by-step instructions with required tools, parts checklist, safety tips, and alignment recommendations
How to Replace Front Struts & Rear Shocks on a 2018 Acura MDX (DIY Guide)
Step-by-step instructions with required tools, parts checklist, safety tips, and alignment recommendations


🔧 MDX - Shock Absorber/Strut Replacement
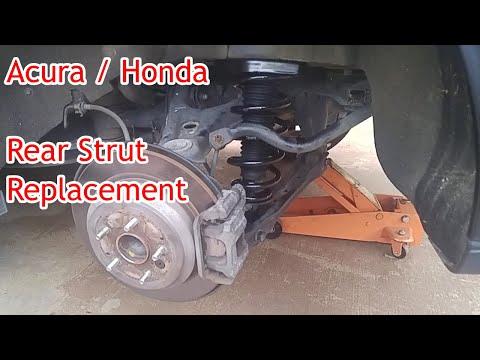
On your MDX, the front suspension uses struts (shock + spring assembly) and the rear uses shocks (separate from the spring). The steps, parts, and torque specs change a lot depending on whether you’re doing the front, rear, or all four.
Difficulty Level: Intermediate | Estimated Time: 2-6 hours
Two quick questions so I can give you the exact OEM-correct steps and torque specs:
- ❓ Are you replacing front struts, rear shocks, or all four?
- ❓ For the front, are you installing complete strut assemblies (quick-struts) or reusing the springs (requires a spring compressor)?
⚠️ Safety & Precautions
- ⚠️ Never work under the MDX supported only by a jack; use jack stands on solid ground.
- ⚠️ Suspension parts can release stored energy; if reusing front springs, a spring compressor is required (this tool compresses the coil spring so it can’t “jump”).
- ⚠️ If you disconnect any ABS/brake line brackets, do not let the caliper/knuckle hang by hoses or wires.
- ⚠️ Final tightening of suspension bolts should be done at normal ride height to avoid bushing damage.
- 🔋 Battery disconnect is usually not required for shocks/struts.
🔧 Required Tools
You'll need the following tools for this repair:
- Floor jack (rated 3-ton minimum)
- Jack stands (rated 3-ton minimum)
- Wheel chocks
- 21mm socket
- 1/2" drive breaker bar
- 1/2" drive torque wrench (20-200 ft-lbs range)
- 3/8" drive ratchet
- 3/8" drive torque wrench (10-80 ft-lbs range)
- Metric socket set (10mm-22mm)
- Metric wrench set (10mm-22mm)
- Pry bar (18"-24")
- Needle-nose pliers
- Flat trim tool
- Paint marker
- Penetrating oil
- Rubber mallet
- Safety glasses
- Mechanic gloves
- Spring compressor (specialty)
- Pass-through strut nut socket set (specialty)
🔩 Required Parts
HowToo sells all the parts you need for this repair:
- Front strut assemblies - Replace in pairs - Qty: 2
- Rear shock absorbers - Replace in pairs - Qty: 2
- Front strut mount kit - Replace in pairs - Qty: 2
- Front strut bearing - Replace in pairs - Qty: 2
- Front bump stop and dust boot kit - Qty: 2
- Rear shock mount hardware kit - Qty: 1
- Replacement self-locking nuts/bolts (suspension) - Qty: 1 set
📋 Before You Begin
- 🅿️ Park on level ground, shift to P, and set the parking brake.
- Use wheel chocks at the wheels staying on the ground.
- Crack the lug nuts loose with a 21mm socket and breaker bar before lifting.
- Spray visible shock/strut fasteners with penetrating oil and wait 10 minutes.
- Plan an alignment after front strut work (recommended anytime struts are removed).
🔨 Step-by-Step Instructions
Follow these steps in order:
Step 1: Confirm which corners you’re replacing
- Please reply: front, rear, or all four.
- Please reply: quick-struts or reuse springs.
- Once you answer, I’ll give the exact OEM-correct removal/installation steps and Torque to XX Nm (YY ft-lbs) specs for each fastener.
Step 2: Do not begin spring disassembly yet (if front)
- If you are reusing springs, do not remove the center strut nut until the spring is compressed with a spring compressor (specialty).
- Spring force can cause severe injury.
✅ After Repair
- Re-check lug nut torque with a torque wrench after a short test drive.
- Listen for clunks over bumps; a clunk often means a mount/hardware issue.
- Get a 4-wheel alignment if front struts were replaced.
💰 DIY vs Shop Cost
Shop Cost: $900-$2,200 (parts + labor)
DIY Cost: $300-$1,200 (parts only)
You Save: $600-$1,000+ by doing it yourself!
Shop labor rates vary but typically run $100-$150/hour. This repair takes a shop approximately 2-6 hours.
🎯 Ready to get started?
HowToo makes it easy: same-day/2-day shipping on every part, plus all the tools and specialty tools you need! Check out the parts and tools sections below to add everything to your cart.
