














How to Replace Front Struts and Rear Shock Absorbers on a 2013-2017 Ford Flex
Step-by-step suspension replacement guide with tools list, parts, safety tips, and alignment notes
How to Replace Front Struts and Rear Shock Absorbers on a 2013-2017 Ford Flex
Step-by-step suspension replacement guide with tools list, parts, safety tips, and alignment notes for 2013, 2014, 2015, 2016, 2017


🔧 Flex - Shock Absorber Replacement
On your Flex, the front “shocks” are built into the front strut assemblies, and the rear uses separate rear shock absorbers. Replacing worn shocks/struts restores ride comfort, braking stability, and tire wear.
Difficulty Level: Advanced | Estimated Time: 4-7 hours
Assumption: stock suspension; torque values can vary—use Ford service specs for your exact build.
⚠️ Safety & Precautions
- ⚠️ Support the vehicle with jack stands—never rely on a floor jack.
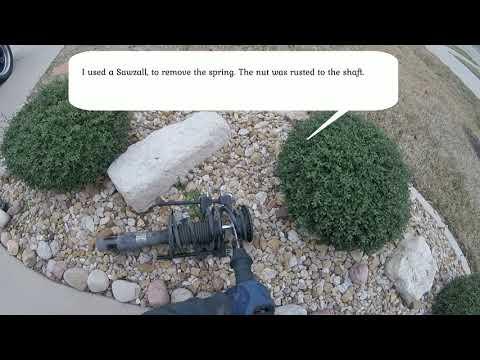
- ⚠️ Front struts contain a coil spring (stored energy). If you disassemble a strut, use a spring compressor (a tool that safely squeezes the spring) and keep hands/face out of the spring’s path.
- ⚠️ Do not let the steering knuckle hang by the brake hose or ABS wire.
- ⚠️ After replacement, you should get a 4-wheel alignment to prevent pulling and tire wear.
- 🔋 Battery disconnect is not required for this job.
🔧 Required Tools
You'll need the following tools for this repair:
- Floor jack (rated 3-ton minimum)
- Jack stands (rated 3-ton minimum)
- Wheel chocks
- Lug nut socket (19mm)
- Socket set 8mm-24mm
- Wrench set 8mm-24mm
- Breaker bar (1/2")
- Torque wrench (1/2", 20-250 ft-lbs range)
- Torque wrench (3/8", 10-80 ft-lbs range)
- Pry bar (18")
- Hammer (2 lb)
- Punch (6mm-10mm)
- Needle-nose pliers
- Trim removal tool set
- Penetrating oil
- Paint marker
- Spring compressor (specialty)
- Strut spreader tool (specialty)
- Safety glasses
- Mechanic gloves
🔩 Required Parts
HowToo sells all the parts you need for this repair:
- Front strut assemblies - Replace in pairs - Qty: 2
- Rear shock absorbers - Replace in pairs - Qty: 2
- Front upper strut mounts/bearings - If not included with struts - Qty: 2
- Rear upper shock mounts - If worn/cracked - Qty: 2
- New self-locking nuts/bolts for strut-to-knuckle and shock mounts - As needed - Qty: 1 set
📋 Before You Begin
- Park on level ground, set the parking brake, and place wheel chocks at the opposite end you’re lifting.
- Use a 19mm lug nut socket to crack the lug nuts loose 1/2 turn before lifting.
- Spray penetrating oil on lower strut bolts (front) and lower shock bolts (rear) and let it soak while you set up.
- If you’re replacing front struts and reusing springs, set your spring compressor nearby and read its instructions first.
🔨 Step-by-Step Instructions
Follow these steps in order:
Step 1: Lift and secure the front
- Use a floor jack (rated 3-ton minimum) to lift the front at the proper jacking point.
- Set the vehicle onto jack stands (rated 3-ton minimum) and shake the car gently to confirm it’s stable.
- Remove the front wheels using a 19mm lug nut socket.
Step 2: Disconnect brackets and links at the front strut
- Use a socket set 8mm-24mm to remove the brake hose/ABS wire brackets from the strut body (do not open the brake system).
- If equipped, disconnect the sway bar end link from the strut using a wrench set 8mm-24mm.
- Tip: Hold the link stud with a wrench if it spins.
Step 3: Mark camber position (helps alignment get close)
- Use a paint marker to mark the position of the strut-to-knuckle bolts/washers relative to the knuckle.
- This does not replace a professional alignment, but it helps you drive safely to the shop.
Step 4: Remove the strut from the steering knuckle
- Support the steering knuckle with a floor jack (rated 3-ton minimum) so it doesn’t drop.
- Use a breaker bar (1/2") and socket set 8mm-24mm to remove the lower strut-to-knuckle bolts.
- If the knuckle clamps tightly to the strut, use a strut spreader tool (specialty) to slightly open the clamp.
- Tap bolts out with a hammer (2 lb) and punch (6mm-10mm) if needed.
- Torque to factory specification (Ford service info) when reinstalling these bolts.
Step 5: Remove the front strut assembly from the body
- Open the hood.
- Use a socket set 8mm-24mm to remove the upper strut mount nuts.
- Hold the strut with one hand as you remove the last nut, then pull the strut assembly out through the wheel well.
- Torque to factory specification (Ford service info) for the upper mount nuts during installation.
Step 6: If reusing the spring, transfer parts (skip if using complete quick-struts)
- Install the spring compressor (specialty) on opposite sides of the coil spring and compress evenly until the spring is loose at the mount.
- Use a socket set 8mm-24mm to remove the center top nut and transfer the mount/bearing and isolators to the new strut.
- Slowly release the spring compressor, making sure the spring ends seat correctly in the rubber pads.
- Tip: If anything looks crooked, stop and reseat.
Step 7: Install the new front strut
- Position the strut into the strut tower and hand-start the upper nuts using a socket set 8mm-24mm.
- Guide the strut into the knuckle, align your paint marks, and install the lower bolts using a socket set 8mm-24mm.
- Reconnect sway bar end link and all brackets using a wrench set 8mm-24mm.
- Final-tighten fasteners using a torque wrench (1/2").
- Torque to factory specification (Ford service info) for all suspension fasteners.
Step 8: Repeat front on the other side
- Replace the other front strut the same way so handling stays balanced.
Step 9: Lift and secure the rear
- Chock the front wheels using wheel chocks.
- Use a floor jack (rated 3-ton minimum) to lift the rear and support with jack stands (rated 3-ton minimum).
- Remove the rear wheels using a 19mm lug nut socket.
Step 10: Access the upper rear shock mount
- In the cargo area, remove the necessary interior trim to reach the shock upper mount using a trim removal tool set and needle-nose pliers.
- Use a socket set 8mm-24mm to loosen (but not fully remove) the upper mount nuts.
Step 11: Remove the rear shock
- Support the rear suspension arm slightly with a floor jack (rated 3-ton minimum).
- Use a breaker bar (1/2") and socket set 8mm-24mm to remove the lower shock bolt.
- Now fully remove the upper mount nuts using a socket set 8mm-24mm and pull the shock out.
- Torque to factory specification (Ford service info) when reinstalling upper and lower shock fasteners.
Step 12: Install the new rear shock
- Install the new shock in place and hand-start the upper nuts using a socket set 8mm-24mm.
- Align the lower mount and install the lower bolt using a socket set 8mm-24mm.
- Snug everything, then final-torque using a torque wrench (1/2").
- Torque to factory specification (Ford service info) for all shock fasteners.
Step 13: Reinstall wheels and set the vehicle on the ground
- Reinstall wheels using a 19mm lug nut socket.
- Lower the vehicle carefully using the floor jack (rated 3-ton minimum).
- Torque lug nuts in a star pattern using a torque wrench (1/2"): Torque to factory specification (Ford service info).
✅ After Repair
- Start the engine and turn the steering lock-to-lock while stopped. Listen for clunks or rubbing.
- Road test at low speed first. Recheck for noises over bumps.
- Get a 4-wheel alignment as soon as possible (especially after front struts).
- After 50-100 miles, recheck visible fasteners and look for anything shifting or leaking.
💰 DIY vs Shop Cost
Shop Cost: $900-$2,200 (parts + labor)
DIY Cost: $350-$900 (parts only)
You Save: $550-$1,300 by doing it yourself!
Shop labor rates vary but typically run $100-$150/hour. This repair takes a shop approximately 4-7 hours.
🎯 Ready to get started?
HowToo makes it easy: same-day/2-day shipping on every part, plus all the tools and specialty tools you need! Check out the parts and tools sections below to add everything to your cart.
Guide for Suspension Strut and Coil Spring Assembly replace for these Ford vehicles
| Year Make Model | Sub Model | Engine | Body Style |
|---|---|---|---|
| 2017 Ford Flex | - | - | - |
| 2016 Ford Flex | - | - | - |
| 2015 Ford Flex | - | - | - |
| 2014 Ford Flex | - | - | - |
| 2013 Ford Flex | - | - | - |