


How to Replace Front Lower Ball Joints on a 2018 Honda Ridgeline (Step-by-Step)
Tools, parts list, safety tips, ball joint press steps, and key torque specs for both sides
How to Replace Front Lower Ball Joints on a 2018 Honda Ridgeline (Step-by-Step)
Tools, parts list, safety tips, ball joint press steps, and key torque specs for both sides


🔧 Ridgeline - Front Lower Ball Joint Replacement
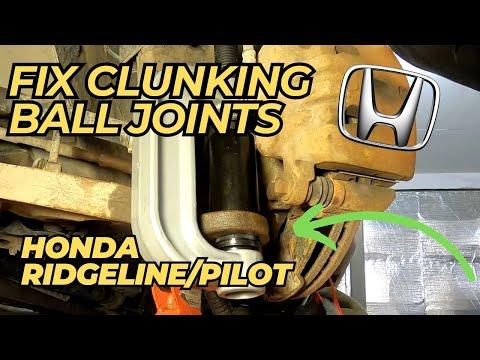
On your Ridgeline, the “serviceable” ball joints most people replace are the front lower ball joints (one per side). These wear and can cause clunks, loose steering, or uneven tire wear; replacement requires separating the steering knuckle and pressing the joint in/out.
Difficulty Level: Advanced | Estimated Time: 3-6 hours
⚠️ Safety & Precautions
- ⚠️ Support the truck with jack stands; never rely on a floor jack.
- ⚠️ Wear safety glasses; ball joint separation can release suddenly.
- ⚠️ Do not let the steering knuckle hang by the brake hose/ABS wire—support it.
- ⚠️ If you remove the axle nut/axle from the hub, protect the CV boots from over-bending.
- 🔋 Battery disconnect is not required for this job.
🔧 Required Tools
You'll need the following tools for this repair:
- Floor jack (rated 3-ton minimum)
- Jack stands (rated 3-ton minimum)
- Wheel chocks
- Lug nut socket 22mm
- Breaker bar 1/2"
- Torque wrench 1/2"
- Socket set 10mm-24mm (1/2")
- Wrench set 10mm-24mm
- Pliers for cotter pins
- Hammer 2 lb
- Pry bar 18"
- Ball joint separator fork (specialty)
- Ball joint press kit (specialty)
- Snap-ring pliers (specialty)
- Bungee cord
- Penetrating oil
- Paint marker
- Mechanic gloves
- Safety glasses
🔩 Required Parts
HowToo sells all the parts you need for this repair:
- Front lower ball joint - Replace in pairs - Qty: 2
- New cotter pins - Qty: 2
- Lower ball joint snap ring - Qty: 2
📋 Before You Begin
- Park on level ground, set the parking brake, and place wheel chocks behind the rear tires.
- Break the front lug nuts loose 1/2 turn using a 22mm lug socket and breaker bar before lifting.
- Plan for an alignment: any time a ball joint is replaced, a front alignment is strongly recommended.
- Ball joint press = a clamp-style press.
🔨 Step-by-Step Instructions
Follow these steps in order:
Step 1: Lift and remove the wheel
- Lift the front using a floor jack and support with jack stands at the proper front lift points.
- Remove the wheel using a 22mm lug socket.
Step 2: Free up access around the knuckle
- Spray the ball joint nut area with penetrating oil.
- If needed for room, remove the stabilizer link from the strut or lower arm using the correct socket/wrench.
- Support the steering knuckle with a bungee cord so it can’t pull on the brake hose/ABS wire.
Step 3: Remove the cotter pin and ball joint nut
- Straighten and remove the cotter pin using pliers for cotter pins.
- Remove the lower ball joint castle nut using the appropriate socket and breaker bar.
Step 4: Separate the ball joint stud from the steering knuckle
- Use a ball joint separator fork (specialty) and a 2 lb hammer to pop the stud free from the knuckle.
- Keep your fingers clear when it releases.
Step 5: Press the old ball joint out of the lower control arm
- Remove the ball joint snap ring using snap-ring pliers (specialty).
- Set up the ball joint press kit (specialty) with the correct receiving cup and press the old joint out.
- If it fights you, re-check that the snap ring is fully removed and re-apply penetrating oil.
Step 6: Press the new ball joint in
- Align the new joint squarely in the control arm by hand.
- Use the ball joint press kit (specialty) to press the new joint fully seated.
- Install the new snap ring using snap-ring pliers (specialty). Make sure it is fully seated in its groove.
Step 7: Reconnect the stud to the steering knuckle
- Guide the ball joint stud into the knuckle and install the castle nut by hand.
- Tighten with a torque wrench 1/2": Torque to 108 Nm (80 ft-lbs), then continue tightening as needed to align the cotter pin hole.
- Install a new cotter pin using pliers for cotter pins and bend the legs over.
Step 8: Reinstall anything removed and put the wheel back on
- Reinstall the stabilizer link (if removed) using the correct socket/wrench and tighten securely.
- Reinstall the wheel using a 22mm lug socket.
- Lower the truck and torque the lug nuts in a star pattern using a torque wrench 1/2": Torque to 127 Nm (94 ft-lbs).
Step 9: Repeat on the other side
- Replace the other front lower ball joint the same way.
- Doing both sides keeps handling consistent.
✅ After Repair
- Start your Ridgeline and turn the steering lock-to-lock while parked; listen for any popping or rubbing.
- Test drive slowly and check for clunks over small bumps.
- Get a front wheel alignment as soon as possible.
- Re-check lug nut torque after ~25-50 miles using a torque wrench.
💰 DIY vs Shop Cost
Shop Cost: $450-$950 (parts + labor)
DIY Cost: $80-$220 (parts only)
You Save: $370-$730 by doing it yourself!
Shop labor rates vary but typically run $100-$150/hour. This repair takes a shop approximately 2.5-4.5 hours.
🎯 Ready to get started?
HowToo makes it easy: same-day/2-day shipping on every part, plus all the tools and specialty tools you need! Check out the parts and tools sections below to add everything to your cart.