















How to Replace Front Control Arms on a 2019 GMC Sierra 1500
Step-by-step suspension repair guide with tools, parts, torque specs, and alignment tips for 2019, 2020, 2021, 2022, 2023, 2024, 2025
How to Replace Front Control Arms on a 2019 GMC Sierra 1500
Step-by-step suspension repair guide with tools, parts, torque specs, and alignment tips for 2019, 2020, 2021, 2022, 2023, 2024, 2025


🔧 Control Arms - Front Suspension Replacement
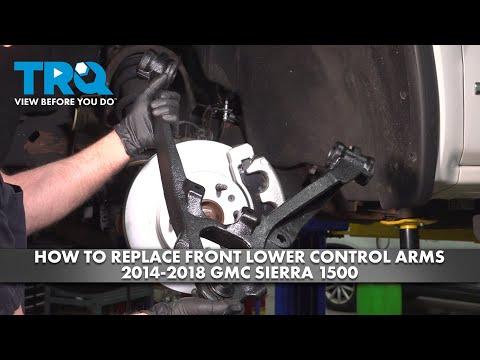
This guide covers replacing the front control arm assembly on your Sierra. Control arms hold the wheel in the correct position and keep the suspension aligned, so a worn or bent arm can cause clunks, uneven tire wear, or loose steering.
Difficulty Level: Advanced | Estimated Time: 3-5 hours
⚠️ Safety & Precautions
- Work on a flat surface and support the truck with jack stands, never just a jack.
- Keep hands clear of the spring and suspension arms. Stored spring force can move parts suddenly.
- If your Sierra has electronic stability or steering angle faults after repair, a scan tool may be needed to clear codes.
- Loosen and tighten final suspension bolts with the suspension at normal ride height to avoid bushing preload.
- Disconnect the negative battery cable only if you must unplug sensors near the repair area.
🔧 Required Tools
You'll need the following tools for this repair:
- Floor jack (rated 3-ton minimum)
- Jack stands (rated for truck weight)
- Wheel chocks
- Lug wrench
- Metric socket set
- Metric wrench set
- Breaker bar
- Torque wrench
- Ball joint separator tool (specialty)
- Penetrating oil
- Bungee cord or wire hanger
- Safety glasses
- Mechanic gloves
🔩 Required Parts
HowToo sells all the parts you need for this repair:
- Front upper control arm - Qty: 1 per side
- Front lower control arm - Qty: 1 per side
- Control arm bolts and nuts - Qty: 1 set per side
- Stabilizer bar link nuts or hardware - Qty: 1 set as needed
- Front wheel alignment - Qty: 1
📋 Before You Begin
- Park on level ground, set the parking brake, and chock the rear wheels.
- Break the front lug nuts loose before lifting the truck.
- If replacing both sides, do one side at a time so you can use the other side as a reference.
- Do not skip the alignment.
🔨 Step-by-Step Instructions
Follow these steps in order:
Step 1: Raise and secure the front end
- Use a floor jack to lift the front of the truck by the proper frame lift point.
- Set the truck on jack stands and keep the floor jack lightly supporting the frame.
- Remove the wheel with a lug wrench.
Step 2: Remove parts blocking the control arm
- Use the appropriate metric socket set and metric wrench set to remove the sway bar link, brake hose brackets, or ABS wire brackets if they block access.
- Support the brake caliper if it must be moved aside using a bungee cord or wire hanger.
- Do not let the caliper hang by the hose.
Step 3: Separate the ball joint
- Use a metric socket set and metric wrench set to remove the ball joint nut from the control arm.
- Use a ball joint separator tool (specialty) to free the ball joint from the knuckle.
- If needed, tap the side of the knuckle lightly while supporting it by hand.
Step 4: Remove the control arm mounting bolts
- Use a breaker bar and metric socket set to remove the inner control arm bolts.
- Note the position of any cam bolts or alignment shims before removal.
- Remove the control arm from the truck.
Step 5: Install the new control arm
- Position the new control arm in place and start all bolts by hand.
- Use the metric socket set and metric wrench set to install the ball joint into the knuckle.
- Install all hardware finger-tight first, then snug it down.
- Torque to factory specification for the control arm pivot bolts and ball joint fastener.
Step 6: Final-torque at ride height
- Raise the suspension with the floor jack until the control arm is at normal ride height.
- Use a torque wrench to final-tighten the inner control arm bolts at ride height.
- Torque to factory specification for all fasteners.
- This protects the rubber bushings.
Step 7: Reassemble and repeat if needed
- Reinstall any brackets, sway bar links, and the wheel using the metric socket set.
- Lower the truck and torque the lug nuts with a torque wrench to factory specification.
- If replacing the other side, repeat the same steps.
✅ After Repair
- Test drive slowly and listen for clunks or pulling.
- Check for steering wheel center and straight tracking.
- Schedule a full front-end alignment right away.
- Recheck all fasteners after the first drive if any unusual noise appears.
💰 DIY vs Shop Cost
Shop Cost: $700-$1,600 (parts + labor)
DIY Cost: $180-$700 (parts only)
You Save: $520-$900 by doing it yourself!
Shop labor rates vary but typically run $100-$150/hour. This repair takes a shop approximately 3-5 hours.
🎯 Ready to get started?
HowToo makes it easy: same-day/2-day shipping on every part, plus all the tools and specialty tools you need! Check out the parts and tools sections below to add everything to your cart.