


How to Replace Engine Mounts on a 2018 Buick Enclave (All Mount Locations)
Step-by-step replacement guide with safety tips, required tools/parts, and torque spec checkpoints
How to Replace Engine Mounts on a 2018 Buick Enclave (All Mount Locations)
Step-by-step replacement guide with safety tips, required tools/parts, and torque spec checkpoints


🔧 Enclave - Engine Mount Replacement
Engine mounts hold the engine/transmission in place and isolate vibration. On your Enclave there are multiple mounts, and the exact bolt sizes, access points, and torque specs vary by which mount you’re replacing.
Difficulty Level: Advanced | Estimated Time: 2.0-4.5 hours
⚠️ Safety & Precautions
- ⚠️ Support the engine before removing any mount; the engine can shift suddenly.
- ⚠️ Never lift the engine by the oil pan without a wood block; direct jack contact can crack/dent the pan.
- ⚠️ Use jack stands; do not work under a vehicle supported only by a jack.
- ⚠️ Keep hands clear while raising/lowering the engine support jack.
- ⚠️ Battery disconnect is recommended if working near the starter/positive cables: use a 10mm socket to remove the negative terminal.
🔧 Required Tools
You'll need the following tools for this repair:
- Floor jack (rated 3-ton minimum)
- Jack stands (rated 3-ton minimum)
- Wheel chocks
- Safety glasses
- Mechanic gloves
- Torque wrench (10-200 ft-lbs range)
- Socket set (8mm-21mm)
- Ratchet (3/8" drive)
- Breaker bar (1/2" drive)
- Extensions set (3"-12")
- Swivel adapter (universal joint)
- E-Torx socket set (external Torx)
- Pry bar (18")
- Trim clip tool
- Flat-blade screwdriver
- Fender cover
- Wood block (2x6 or 2x8, 12"-18" long)
🔩 Required Parts
HowToo sells all the parts you need for this repair:
- Engine mount - Qty: 1
- Transmission mount - Qty: 1
- Lower torque strut mount - Qty: 1
- Engine mount bolts (single-use, if required) - Qty: 1 set
📋 Before You Begin
- Park on level ground, shift to Park, and set the parking brake.
- Chock the rear wheels with wheel chocks.
- Open the hood and remove any engine cover by hand (it pulls up on most setups).
- If you’ll be removing components near electrical power cables, disconnect the battery negative terminal using a 10mm socket.
- Plan how you will support the engine: a floor jack plus a wood block under the engine is the common DIY method.
🔨 Step-by-Step Instructions
Follow these steps in order:
Step 1: Tell me which mount(s) you’re replacing
- There are typically multiple mounts (passenger-side upper engine mount, driver-side transmission mount, and a lower torque strut).
- Please answer these two quick questions so I can give you the exact Buick procedure with the correct bolt sizes and Torque to XX Nm (YY ft-lbs) specs:
- Which mount(s) are you replacing: passenger-side upper, driver-side transmission, lower torque strut, or all of them?
- What symptom are you chasing: clunk on takeoff, vibration at idle, or visible torn mount/leaking hydraulic mount?
Step 2: Quick confirmation checks (no disassembly yet)
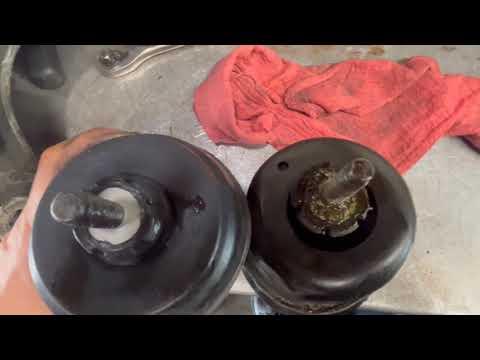
- Use a flashlight and visually inspect each mount for cracked rubber, separated rubber-to-metal, or oily wetness (hydraulic mounts can leak).
- With the hood open, have a helper hold the brake firmly and lightly “power brake” in Drive/Reverse for 1-2 seconds while you watch engine movement. Keep clear of belts/fans.
- If the engine rocks excessively or you hear a sharp clunk, that points to the mount/torque strut on the side of movement.
Step 3: Get ready to support the engine (setup step)
- Lift the front safely using a floor jack (rated 3-ton minimum) and support with jack stands (rated 3-ton minimum).
- Position the wood block (2x6 or 2x8) on the floor jack pad.
- Raise the jack until the wood block just contacts the engine support point; do not lift yet—this is only “taking the weight.”
✅ After Repair
- Recheck that all fasteners are torqued and that nothing is pinched or rubbing (hoses, wiring, exhaust heat shields).
- Start the engine and verify idle vibration is improved.
- Test drive: gentle takeoff/stop, then moderate acceleration to confirm no clunking.
- If the steering wheel is off-center or you hear new vibration, stop and recheck mount alignment and fastener tightness.
💰 DIY vs Shop Cost
Shop Cost: $500-$1,400 (parts + labor, depends on which mount)
DIY Cost: $80-$450 (parts only, depends on which mount)
You Save: $420-$950 by doing it yourself!
Shop labor rates vary but typically run $100-$150/hour. This repair takes a shop approximately 2-4 hours.
🎯 Ready to get started?
HowToo makes it easy: same-day/2-day shipping on every part, plus all the tools and specialty tools you need! Check out the parts and tools sections below to add everything to your cart.
