


How to Replace Engine Mounts on a 2016 Honda Odyssey (All 4 Mounts)
Step-by-step DIY instructions with required tools, parts list, safety tips, and torque specs
How to Replace Engine Mounts on a 2016 Honda Odyssey (All 4 Mounts)
Step-by-step DIY instructions with required tools, parts list, safety tips, and torque specs


🔧 Odyssey - Engine Mount Replacement
Replacing the engine mounts on your Odyssey means safely supporting the engine, unbolting the worn mounts, and installing new mounts in the correct order. Bad mounts can cause clunks, vibration at idle, and excessive engine movement when shifting.
Difficulty Level: Advanced | Estimated Time: 3-6 hours
Assumption: Stock mounts (right/passenger, left/trans, front, rear) with no rust-seized hardware.
⚠️ Safety & Precautions
- 🛑 Support the engine before removing any mount; the engine can drop and damage wiring, hoses, or your hands.
- 🛑 Never work under a vehicle supported only by a jack; always use jack stands.
- 🛑 Keep the jack/wood block on the oil pan ONLY with a wide wood block; do not point-load the pan.
- 🛑 Exhaust and radiator fans can be hot; let the van cool fully.
- 🛑 Disconnect the negative battery cable if you’ll be near the starter/alternator wiring.
🔧 Required Tools
You'll need the following tools for this repair:
- Floor jack (rated 3-ton minimum)
- Jack stands (rated 3-ton minimum)
- Wheel chocks
- Safety glasses
- Mechanic gloves
- Wood block (2x6 or 2x8)
- Engine support bar (specialty)
- Socket set 10mm-19mm
- Deep socket set 14mm-19mm
- Wrench set 10mm-19mm
- Breaker bar 1/2-inch drive
- Torque wrench 20-200 ft-lbs
- Ratchet extensions (3-inch, 6-inch, 12-inch)
- Universal joint adapter 1/2-inch drive
- Trim clip removal tool
- Flathead screwdriver
- Phillips screwdriver
- Penetrating oil
- Paint marker
- Work light
🔩 Required Parts
HowToo sells all the parts you need for this repair:
- Right (passenger-side) engine mount - Qty: 1
- Left (driver-side) transmission mount - Qty: 1
- Front engine mount - Qty: 1
- Rear engine mount - Qty: 1
- Engine mount hardware kit (bolts/nuts) - Qty: 1
📋 Before You Begin
- Park on level ground, set the parking brake, and chock the rear wheels.
- Open the hood and remove any plastic engine covers using a trim clip removal tool and 10mm socket if equipped.
- Spray mount fasteners with penetrating oil and wait 10-15 minutes.
- Plan how you’ll support the engine:
- Best: engine support bar (specialty) across the strut towers (it “hangs” the engine safely).
- Alternative: floor jack with a wood block under the oil pan (gentle contact only).
- If you’ll work near the starter/alternator wiring, disconnect the battery negative terminal using a 10mm wrench.
🔨 Step-by-Step Instructions
Follow these steps in order:
Step 1: Safely raise and support the van
- Use a floor jack (rated 3-ton minimum) to lift the front at the proper jacking point.
- Set the van onto jack stands (rated 3-ton minimum) placed at the pinch welds/subframe points.
- Remove the front lower splash shield (if equipped) using a trim clip removal tool and 10mm socket.
Step 2: Support the engine
- If using an engine support bar (specialty), set it on the strut towers and tension the hook/chain to take engine weight.
- If using a jack, place a wood block (2x6 or 2x8) on the floor jack, then lightly contact the oil pan and raise just until the engine stops “settling.”
- Tip: Lift only enough to hold the engine.
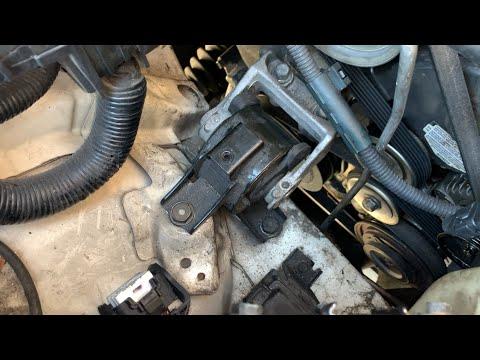
Step 3: Replace the right (passenger-side) engine mount
- Remove the air intake ducting/resonator for access using a flathead screwdriver (hose clamps) and 10mm socket (bolts).
- Use a paint marker to mark mount/bracket positions for reference.
- Remove the mount through-bolt using a 17mm socket and breaker bar 1/2-inch drive.
- Remove mount-to-body bolts using a 14mm socket and ratchet extensions.
- Remove mount-to-bracket bolts using a 14mm socket and universal joint adapter as needed.
- Swap in the new mount, start all bolts by hand, then tighten in this order:
- Mount-to-body bolts: Torque to 54 N·m (40 ft-lbs)
- Mount-to-bracket bolts: Torque to 64 N·m (47 ft-lbs)
- Through-bolt/nut: Torque to 83 N·m (61 ft-lbs)
Step 4: Replace the left (driver-side) transmission mount
- Access is tight; remove any brackets/loom retainers in the way using a 10mm socket and trim clip removal tool.
- Remove the mount through-bolt using a 17mm socket and breaker bar 1/2-inch drive.
- Remove mount-to-frame bolts using a 14mm socket and ratchet extensions.
- Remove mount-to-trans bracket bolts using a 14mm socket.
- Install the new mount and torque:
- Mount-to-frame bolts: Torque to 54 N·m (40 ft-lbs)
- Mount-to-bracket bolts: Torque to 64 N·m (47 ft-lbs)
- Through-bolt/nut: Torque to 83 N·m (61 ft-lbs)
Step 5: Replace the front engine mount
- From underneath, locate the front mount near the front of the subframe.
- Remove the front mount bolts/nuts using a 14mm socket and 17mm socket with ratchet extensions.
- Adjust engine height slightly with the engine support bar (specialty) or floor jack so bolts slide out without force.
- Install the new front mount and torque:
- Mount fasteners: Torque to 54 N·m (40 ft-lbs)
- Through-bolt/nut (if equipped): Torque to 83 N·m (61 ft-lbs)
Step 6: Replace the rear engine mount
- The rear mount sits toward the firewall side and may require more extensions.
- Remove rear mount bolts using a 14mm socket, ratchet extensions (12-inch), and universal joint adapter.
- Carefully raise/lower the engine a little with the floor jack to relieve tension and remove the mount.
- Install the new rear mount and torque:
- Mount fasteners: Torque to 54 N·m (40 ft-lbs)
- Through-bolt/nut (if equipped): Torque to 83 N·m (61 ft-lbs)
Step 7: Reassemble and lower the engine
- Reinstall any brackets/loom retainers using a 10mm socket.
- Reinstall the intake ducting using a flathead screwdriver and 10mm socket.
- Slowly release the engine support bar (specialty) or lower the floor jack so the engine settles naturally on the new mounts.
- Reinstall the splash shield using a trim clip removal tool and 10mm socket.
- Lower the van from the jack stands using the floor jack.
✅ After Repair
- Start the engine and let it idle in Park; check for new vibration, rattles, or warning lights.
- With your foot on the brake, shift slowly P → R → N → D and listen for clunks (a small normal movement is OK).
- Test drive at low speed; recheck for loose bolts or contact marks.
- Recheck mount fasteners after 50-100 miles using a torque wrench 20-200 ft-lbs if anything feels off.
💰 DIY vs Shop Cost
Shop Cost: $900-$1,800 (parts + labor)
DIY Cost: $250-$700 (parts only)
You Save: $650-$1,100 by doing it yourself!
Shop labor rates vary but typically run $100-$150/hour. This repair takes a shop approximately 3-6 hours.
🎯 Ready to get started?
HowToo makes it easy: same-day/2-day shipping on every part, plus all the tools and specialty tools you need! Check out the parts and tools sections below to add everything to your cart.
