


How to Replace Engine Mounts on a 2016 BMW X3 (N20 2.0T)
Step-by-step DIY guide with required tools/parts, safety tips, and BMW torque spec notes
How to Replace Engine Mounts on a 2016 BMW X3 (N20 2.0T)
Step-by-step DIY guide with required tools/parts, safety tips, and BMW torque spec notes


🔧 X3 - Engine Mount Replacement
Worn engine mounts can cause vibration at idle, clunks on acceleration/braking, and extra movement of the engine. On your X3, the mounts are hydraulic-style isolators that support the engine and absorb vibration, so replacing them restores smoothness and protects other parts.
Difficulty Level: Advanced | Estimated Time: 4-7 hours
Assumption: Stock N20 2.0T layout; fasteners/torques follow BMW service info.
⚠️ Safety & Precautions
- ⚠️ Support the engine before removing any mount fasteners (an engine support bar holds the engine from above; a jack can slip).
- ⚠️ Never place any part of your body under the engine while mounts are loose.
- ⚠️ Work on a level surface and support the vehicle with jack stands at the correct lift points.
- ⚠️ Keep clear of the cooling fan area; it can start unexpectedly if the key is on.
- ⚠️ Battery disconnect is not normally required, but disconnect the negative terminal if your tools will be near the starter/positive cable area.
- ⚠️ BMW commonly uses single-use aluminum bolts in this area—replace any “aluminum”/torque-to-yield fasteners you remove.
🔧 Required Tools
You'll need the following tools for this repair:
- Engine support bar (specialty)
- Floor jack (rated 3-ton minimum)
- Jack stands (rated 3-ton minimum)
- Wheel chocks
- Metric socket set 8mm-18mm
- Metric deep socket set 13mm-18mm
- E-Torx socket set E10-E14
- Torx bit set T20-T30
- 3/8" drive ratchet
- 1/2" drive breaker bar
- Torque wrench 10-60 Nm
- Torque wrench 40-200 Nm
- Trim clip removal tool
- Pry bar
- Paint marker
- Work light
- Mechanic gloves
- Safety glasses
🔩 Required Parts
HowToo sells all the parts you need for this repair:
- Engine mount (left) - Qty: 1
- Engine mount (right) - Qty: 1
- New engine mount fastener kit - Qty: 1
- Underbody shield fastener kit - Qty: 1
📋 Before You Begin
- Park on level ground, set the parking brake, and chock the rear wheels.
- Let the engine cool fully; you’ll be working near hot exhaust and turbo piping.
- Plan how you’ll support the engine: use an engine support bar (specialty) across the strut towers. (This tool holds the engine up from above using a threaded hook.)
- Raise the front and support with jack stands (rated 3-ton minimum) at the factory lift points.
- Keep a floor jack (rated 3-ton minimum) available to gently “steady” the engine with a wide wood pad if needed, but don’t rely on it as the only support.
🔨 Step-by-Step Instructions
Follow these steps in order:
Step 1: Remove the lower underbody panels
- Use a Torx bit set T20-T30 and trim clip removal tool to remove the fasteners holding the splash shields and access panels.
- Use a work light to locate hidden fasteners along the rear edge of the shields.
- Bag and label fasteners by panel.
Step 2: Remove any front reinforcement/brace blocking access (if equipped)
- Use an E-Torx socket set E10-E14 and metric socket set 13mm-18mm to remove the bolts from the front brace/plate under the engine (varies by equipment).
- Mark brace position with a paint marker before removal.
- Torque to BMW specification during reinstallation (fasteners may be single-use).
Step 3: Set up the engine support bar
- Install the engine support bar (specialty) across the strut towers per the tool’s instructions.
- Attach the support hook/chain to a solid engine lift point.
- Tension the support bar until it just begins to carry the engine’s weight (do not lift hard yet).
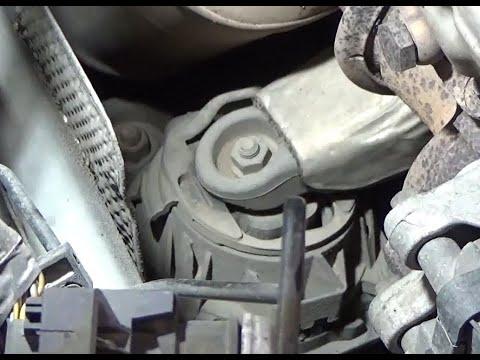
Step 4: Locate both engine mounts and identify the fasteners
- From underneath, use a work light to find each mount between the engine bracket and the subframe.
- Each mount typically has an upper fastener to the engine bracket and a lower fastener to the subframe.
Step 5: Remove the lower fastener(s) at the subframe (one side at a time)
- Use a metric deep socket set 13mm-18mm with a 3/8" drive ratchet to remove the lower nut/bolt on the first mount.
- If tight, use a 1/2" drive breaker bar carefully.
- Torque to BMW specification on reassembly using a torque wrench 40-200 Nm.
Step 6: Remove the upper fastener(s) at the engine bracket
- Use an E-Torx socket set E10-E14 and/or metric socket set 13mm-18mm (varies by side) to remove the upper nut/bolt.
- Slightly raise the engine with the engine support bar (specialty) as needed to take pressure off the bolt.
- Torque to BMW specification on reassembly using a torque wrench 10-60 Nm or 40-200 Nm as appropriate to the fastener size.
Step 7: Lift the engine slightly to create clearance
- Turn the adjuster on the engine support bar (specialty) to lift the engine just enough to slide the mount out.
- If needed, use a pry bar gently to help free the mount from its locating tabs.
- Lift only what you need, not inches.
Step 8: Remove the old mount and install the new mount
- Remove the mount by hand; if stuck, use a pry bar carefully against sturdy metal (not plastic hoses).
- Install the new mount in the same orientation as the original.
- Start all fasteners by hand first to prevent cross-threading.
Step 9: Lower the engine and tighten fasteners in the correct order
- Lower the engine slowly using the engine support bar (specialty) until the mount seats naturally.
- Snug the upper fastener first using an E-Torx socket set E10-E14 or metric socket.
- Snug the lower fastener next using a metric deep socket.
- Final tighten using the appropriate torque wrench: Torque to BMW specification.
Step 10: Repeat the replacement on the other side
- Repeat Steps 5 through 9 for the second mount.
- Keep the engine supported the entire time with the engine support bar (specialty).
Step 11: Reinstall braces and underbody panels
- Reinstall any reinforcement/brace using the E-Torx socket set E10-E14 and metric socket set 13mm-18mm.
- Tighten with a torque wrench 40-200 Nm: Torque to BMW specification.
- Reinstall all underbody panels using the Torx bit set T20-T30 and trim clip removal tool.
✅ After Repair
- Start the engine and let it idle. Listen for clunks and watch for excessive engine movement.
- With the hood open, lightly blip the throttle while in Park (no revving high). The engine should not “jump” aggressively.
- Test drive and check for vibration improvements and any new noises over bumps.
- Recheck underneath for any forgotten tools/loose panels after the first short drive.
💰 DIY vs Shop Cost
Shop Cost: $900-$1,700 (parts + labor)
DIY Cost: $180-$450 (parts only)
You Save: $720-$1,250 by doing it yourself!
Shop labor rates vary but typically run $100-$150/hour. This repair takes a shop approximately 4-7 hours.
🎯 Ready to get started?
HowToo makes it easy: same-day/2-day shipping on every part, plus all the tools and specialty tools you need! Check out the parts and tools sections below to add everything to your cart.