









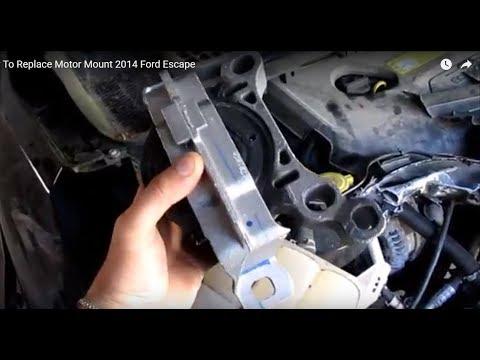



How to Replace Engine Mounts on a 2013-2019 Ford Escape (Engine: Inline 4 2.5L)
Step-by-step guide with tools, parts, torque specs, safety tips, and cost savings
How to Replace Engine Mounts on a 2013-2019 Ford Escape (Engine: Inline 4 2.5L)
Step-by-step guide with tools, parts, torque specs, safety tips, and cost savings for 2013, 2014, 2015, 2016, 2017, 2018, 2019


🔧 Escape - Engine Mount Replacement
Engine mounts hold the engine in position and reduce vibration inside the cabin. On your Escape, the main DIY-serviceable mounts are the passenger-side upper engine mount and the lower torque mount; replace one mount at a time so the engine stays controlled.
Difficulty Level: Intermediate | Estimated Time: 2-4 hours
⚠️ Safety & Precautions
- ⚠️ Support the engine before removing mount bolts. The engine can shift when a mount is removed.
- ⚠️ Never work under your Escape with only a floor jack holding it up. Use jack stands.
- ⚠️ Use a wood block between the jack and oil pan so the jack does not dent or crack the pan.
- ⚠️ Keep fingers away from the gap between the mount, bracket, and body.
- ⚠️ Disconnect the negative battery cable before working near wiring and metal brackets.
- ⚠️ Do not remove multiple mounts at the same time unless the engine and transmission are fully supported.
🔧 Required Tools
You'll need the following tools for this repair:
- 7mm socket
- 8mm socket
- 10mm socket
- 13mm socket
- 15mm socket
- 18mm socket
- 21mm socket
- 10mm wrench
- 1/4-inch ratchet
- 3/8-inch ratchet
- 1/2-inch ratchet
- 3-inch extension
- 6-inch extension
- Breaker bar
- Torque wrench rated 10-150 ft-lbs
- Floor jack rated 2-ton minimum
- Jack stands rated 2-ton minimum
- Wheel chocks
- Wood block 2x6
- Trim clip removal tool
- Flat-blade screwdriver
- Paint marker
- Work light
- Mechanic gloves
- Safety glasses
🔩 Required Parts
HowToo sells all the parts you need for this repair:
- Passenger-side upper engine mount - Qty: 1
- Lower engine torque mount - Qty: 1
- Engine mount bolts - Qty: as needed if stretched, rusted, or damaged
- Underbody splash shield clips - Qty: as needed if broken
📋 Before You Begin
- Park your Escape on flat, solid ground.
- Shift to Park and set the parking brake.
- Place wheel chocks behind the rear wheels.
- Let the engine cool completely.
- Use a 10mm wrench to disconnect the negative battery cable.
- A torque wrench is a tool that tightens bolts to the correct measured tightness.
- A breaker bar is a long handle used to safely loosen very tight bolts.
🔨 Step-by-Step Instructions
Follow these steps in order:
Step 1: Open the Engine Bay
- Use mechanic gloves and safety glasses.
- Use a work light to see the passenger-side upper mount area clearly.
- If equipped, lift the plastic engine cover straight up by hand.
Step 2: Move the Air Intake Tube Aside
- Use an 8mm socket and 1/4-inch ratchet to loosen the air intake hose clamp.
- Use a flat-blade screwdriver to gently release any plastic retaining tabs.
- Move the intake tube aside by hand to improve access.
- Take a photo first.
Step 3: Raise the Front of the Vehicle
- Use a floor jack rated 2-ton minimum to raise the front of your Escape.
- Place jack stands rated 2-ton minimum under the approved front support points.
- Lower the vehicle gently onto the jack stands.
- Leave the floor jack free so it can support the engine next.
Step 4: Remove the Lower Splash Shield
- Use a 7mm socket or 8mm socket with a 1/4-inch ratchet to remove the splash shield screws.
- Use a trim clip removal tool to remove plastic push clips. A trim clip tool lifts plastic clips without breaking them.
- Lower the shield by hand and set it aside.
Step 5: Support the Engine
- Place a wood block 2x6 on the pad of the floor jack rated 2-ton minimum.
- Position the wood block under the engine oil pan.
- Raise the jack slowly until the wood just contacts the oil pan.
- Lift only enough to support the engine. Do not raise the vehicle off the jack stands.
- Small jack movements only.
Step 6: Mark the Upper Mount Location
- Use a paint marker to outline the passenger-side upper engine mount position on the body bracket.
- This gives you a simple guide when placing the new mount.
Step 7: Remove the Passenger-Side Upper Mount Fasteners
- Use a 15mm socket, 3/8-inch ratchet, and 6-inch extension to loosen the mount-to-engine bracket fasteners.
- Use an 18mm socket, 1/2-inch ratchet, and breaker bar to loosen the body-side mount fasteners if tight.
- Remove the fasteners by hand after they are loose.
- If a bolt binds, use the floor jack rated 2-ton minimum to raise or lower the engine slightly until the bolt slides out easily.
Step 8: Remove the Passenger-Side Upper Mount
- Lift the old mount out by hand.
- If it feels stuck, use the floor jack rated 2-ton minimum to make a very small height adjustment.
- Do not force it with a pry bar against aluminum brackets.
Step 9: Install the New Passenger-Side Upper Mount
- Set the new passenger-side upper engine mount into place by hand.
- Start every nut and bolt by hand first to avoid cross-threading.
- Use the floor jack rated 2-ton minimum to slightly adjust engine height until all holes line up naturally.
- Use a 15mm socket, 18mm socket, 3/8-inch ratchet, and 1/2-inch ratchet to snug the fasteners evenly.
- Use a torque wrench rated 10-150 ft-lbs for final tightening.
- Torque mount-to-engine bracket fasteners to 80 Nm (59 ft-lbs).
- Torque mount-to-body fasteners to 90 Nm (66 ft-lbs).
Step 10: Remove the Lower Torque Mount
- Move under the front of your Escape with safety glasses on.
- Locate the lower torque mount between the engine/transmission assembly and the subframe.
- Use a 15mm socket or 18mm socket with a 1/2-inch ratchet to loosen the torque mount bolts.
- Use a breaker bar if the bolts are tight.
- Remove the bolts by hand and pull the lower mount out.
Step 11: Install the New Lower Torque Mount
- Place the new lower engine torque mount into position by hand.
- Start all bolts by hand first.
- Use the floor jack rated 2-ton minimum to make tiny engine position changes if the bolt holes do not line up.
- Use a 15mm socket or 18mm socket with a 1/2-inch ratchet to snug the bolts.
- Use a torque wrench rated 10-150 ft-lbs for final tightening.
- Torque lower torque mount bolts to 103 Nm (76 ft-lbs).
Step 12: Reinstall the Lower Splash Shield
- Lift the splash shield into place by hand.
- Use a trim clip removal tool to help align plastic clips.
- Use a 7mm socket or 8mm socket with a 1/4-inch ratchet to reinstall the screws.
- Tighten the small screws snug only.
Step 13: Lower the Vehicle
- Use the floor jack rated 2-ton minimum to raise the vehicle slightly off the jack stands.
- Remove the jack stands rated 2-ton minimum.
- Lower your Escape slowly to the ground.
Step 14: Reconnect the Intake and Battery
- Reinstall the air intake tube by hand.
- Use an 8mm socket and 1/4-inch ratchet to tighten the intake clamp.
- Push the engine cover back into place by hand if equipped.
- Use a 10mm wrench to reconnect the negative battery cable.
- Torque battery terminal nut to 5 Nm (44 in-lbs).
✅ After Repair
- ✅ Start your Escape and let it idle for 1-2 minutes.
- ✅ Listen for clunks, rattles, or new vibration.
- ✅ With your foot firmly on the brake, shift from Park to Reverse, then Drive.
- ✅ A little engine movement is normal. A hard jump or loud clunk means something is loose or misaligned.
- ✅ Take a short, gentle test drive.
- ✅ Recheck the mount area for shifted parts, loose fasteners, or contact marks.
💰 DIY vs Shop Cost
Shop Cost: $450-$900 (parts + labor)
DIY Cost: $120-$350 (parts only)
You Save: $330-$550 by doing it yourself!
Shop labor rates vary but typically run $100-$150/hour. This repair takes a shop approximately 2-4 hours.
🎯 Ready to get started?
HowToo makes it easy: same-day/2-day shipping on every part, plus all the tools and specialty tools you need! Check out the parts and tools sections below to add everything to your cart.
Guide for Engine Mount replace for these Ford vehicles
| Year Make Model | Sub Model | Engine | Body Style |
|---|---|---|---|
| 2019 Ford Escape | - | Inline 4 2.5L | - |
| 2019 Ford Escape | - | Inline 4 2.0L | - |
| 2019 Ford Escape | - | Inline 4 1.5L | - |
| 2018 Ford Escape | - | Inline 4 2.5L | - |
| 2018 Ford Escape | - | Inline 4 2.0L | - |
| 2018 Ford Escape | - | Inline 4 1.5L | - |
| 2017 Ford Escape | - | Inline 4 2.5L | - |
| 2017 Ford Escape | - | Inline 4 2.0L | - |
| 2017 Ford Escape | - | Inline 4 1.5L | - |
| 2016 Ford Escape | - | Inline 4 2.5L | - |
| 2016 Ford Escape | - | Inline 4 1.6L | - |
| 2016 Ford Escape | - | Inline 4 2.0L | - |
| 2015 Ford Escape | - | Inline 4 2.5L | - |
| 2015 Ford Escape | - | Inline 4 1.6L | - |
| 2015 Ford Escape | - | Inline 4 2.0L | - |
| 2014 Ford Escape | - | Inline 4 2.5L | - |
| 2014 Ford Escape | - | Inline 4 1.6L | - |
| 2014 Ford Escape | - | Inline 4 2.0L | - |
| 2013 Ford Escape | - | Inline 4 2.5L | - |
| 2013 Ford Escape | - | Inline 4 1.6L | - |
| 2013 Ford Escape | - | Inline 4 2.0L | - |