










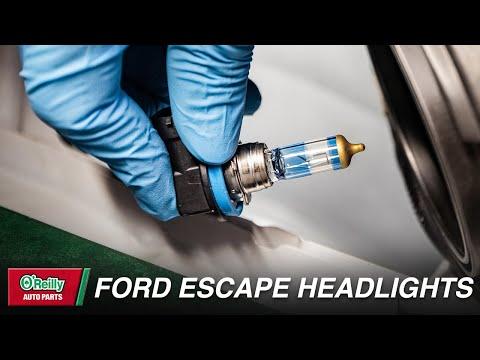







How to Replace Both Headlight Bulbs on a 2013-2022 Ford Escape (Trim: SE)
Step-by-step H11 low-beam bulb guide with tools, parts, safety tips, and DIY cost savings
How to Replace Both Headlight Bulbs on a 2013-2022 Ford Escape (Trim: SE)
Step-by-step H11 low-beam bulb guide with tools, parts, safety tips, and DIY cost savings for 2013, 2014, 2015, 2016, 2017, 2018, 2019, 2020, 2021, 2022


🔧 Escape - Headlight Bulb Replacement
Replacing both low-beam headlight bulbs on your Escape is a beginner-friendly job. The bulbs are accessed from behind each headlamp housing, and replacing both sides together keeps brightness and color even.
Difficulty Level: Beginner | Estimated Time: 30-60 minutes
⚠️ Safety & Precautions
- ⚠️ Turn the headlights and ignition completely off before starting.
- ⚠️ Let the bulbs cool for at least 10 minutes if the lights were recently on.
- ⚠️ Do not touch the glass part of a halogen bulb with bare fingers; skin oil can shorten bulb life.
- ⚠️ Wear nitrile gloves to keep the new bulbs clean.
- ⚠️ Battery disconnect is not required for this repair, but keep the key away from the vehicle while working.
🔧 Required Tools
You'll need the following tools for this repair:
- Nitrile gloves
- Safety glasses
- Flashlight
- Trim clip removal tool
- Flat-blade screwdriver 1/4-inch
- Clean microfiber cloth
🔩 Required Parts
HowToo sells all the parts you need for this repair:
- Low-beam headlight bulbs H11 halogen - Qty: 2
📋 Before You Begin
- Park your Escape on level ground and set the parking brake.
- Turn the headlight switch to OFF.
- Open the hood and support it securely.
- Put on nitrile gloves and safety glasses.
- A trim clip removal tool is a small pry tool used to lift plastic clips without breaking them.
- Assumption: This procedure covers the standard halogen low-beam headlight bulbs on your Escape.
🔨 Step-by-Step Instructions
Follow these steps in order:
Step 1: Open the Hood and Locate the Headlight Backs
- Use your hand to release the hood latch inside the cabin.
- Use your hand to lift the hood and secure it with the hood prop rod.
- Use a flashlight to look behind each headlight housing.
- The low-beam bulb sits behind a round access cover on the rear of the headlamp assembly.
- Work on one side at a time.
Step 2: Create Working Room on the Driver Side
- Use a flashlight to inspect the space behind the driver-side headlamp.
- If the air intake duct blocks your hand, use a trim clip removal tool to lift the plastic retainer clips.
- Use a flat-blade screwdriver 1/4-inch only if a clip is tight, and pry gently.
- Move the duct enough to reach the rear headlight cover.
- Do not pull hard on wiring or plastic ducting.
Step 3: Remove the Driver-Side Headlight Access Cover
- Use your hand to turn the round rear access cover counterclockwise.
- Pull the cover straight back and set it aside.
- Use a flashlight to identify the bulb connector inside the housing.
Step 4: Disconnect the Driver-Side Bulb Connector
- Use your fingers to press the locking tab on the electrical connector.
- Pull the connector straight off the bulb.
- If the connector is stuck, use a flat-blade screwdriver 1/4-inch to gently help press the tab while pulling by hand.
- Do not pull on the wires.
Step 5: Remove the Driver-Side Bulb
- Use your gloved hand to turn the bulb counterclockwise about a quarter turn.
- Pull the bulb straight out of the headlamp housing.
- Compare the old bulb to the new H11 bulb before installing.
Step 6: Install the New Driver-Side Bulb
- Use nitrile gloves and hold the new bulb by the plastic base only.
- If the glass is touched, wipe it clean with a clean microfiber cloth.
- Insert the new H11 bulb into the headlamp housing with the tabs aligned.
- Use your gloved hand to turn the bulb clockwise until it locks in place.
- No torque spec applies; the bulb locks by hand pressure only.
Step 7: Reconnect the Driver-Side Bulb Connector
- Use your hand to push the electrical connector onto the bulb until it clicks.
- Gently tug the connector by the plastic body to confirm it is locked.
- Use the flashlight to confirm the connector is fully seated.
Step 8: Reinstall the Driver-Side Access Cover
- Use your hand to place the round access cover back onto the rear of the headlamp.
- Turn the cover clockwise until it is fully seated.
- Make sure the cover is sealed evenly to keep moisture out.
Step 9: Create Working Room on the Passenger Side
- Use a flashlight to inspect the area behind the passenger-side headlamp.
- If a plastic cover or duct is in the way, use a trim clip removal tool to release the plastic clips gently.
- Use a flat-blade screwdriver 1/4-inch only for stubborn clips.
- Move only what is needed to reach the round access cover.
Step 10: Remove the Passenger-Side Bulb
- Use your hand to turn the round access cover counterclockwise and remove it.
- Use your fingers to press the bulb connector locking tab.
- Pull the connector straight off the bulb.
- Use your gloved hand to turn the bulb counterclockwise about a quarter turn.
- Pull the bulb straight out.
Step 11: Install the New Passenger-Side Bulb
- Use nitrile gloves and hold the new H11 bulb by the plastic base only.
- Insert the bulb into the headlamp housing with the tabs aligned.
- Use your gloved hand to turn the bulb clockwise until it locks.
- No torque spec applies; the bulb locks by hand pressure only.
- Push the electrical connector onto the bulb until it clicks.
Step 12: Reinstall Covers and Any Removed Ducts
- Use your hand to reinstall the passenger-side round access cover.
- Turn the cover clockwise until fully seated.
- Use your hand to place any moved ducting or plastic covers back into position.
- Use a trim clip removal tool or your fingers to reinstall any plastic clips.
- Make sure nothing is loose near the belts, fan, or intake ducting.
✅ After Repair
- ✅ Turn the ignition on without starting the engine.
- ✅ Turn the headlights on and confirm both low beams work.
- ✅ Check high beams and parking lights to make sure nothing else was disturbed.
- ✅ Stand in front of the vehicle and confirm both headlight beams look even.
- ✅ If one bulb does not work, turn the lights off and recheck the connector on that side.
- ✅ No scan tool, battery registration, coding, or infotainment reset is required.
💰 DIY vs Shop Cost
Shop Cost: $120-$220 parts + labor
DIY Cost: $25-$70 parts only
You Save: $95-$150 by doing it yourself!
Shop labor rates vary but typically run $100-$150/hour. This repair takes a shop approximately 0.5-1.0 hours.
🎯 Ready to get started?
HowToo makes it easy: same-day/2-day shipping on every part, plus all the tools and specialty tools you need! Check out the parts and tools sections below to add everything to your cart.
Guide for Headlight Bulb replace for these Ford vehicles
| Year Make Model | Sub Model | Engine | Body Style |
|---|---|---|---|
| 2022 Ford Escape | S | - | - |
| 2022 Ford Escape | SE | - | - |
| 2022 Ford Escape | SEL | - | - |
| 2021 Ford Escape | S | - | - |
| 2021 Ford Escape | SE | - | - |
| 2021 Ford Escape | SEL | - | - |
| 2020 Ford Escape | S | - | - |
| 2020 Ford Escape | SE | - | - |
| 2020 Ford Escape | SEL | - | - |
| 2019 Ford Escape | S | - | - |
| 2019 Ford Escape | SE | - | - |
| 2019 Ford Escape | SEL | - | - |
| 2018 Ford Escape | S | - | - |
| 2018 Ford Escape | SE | - | - |
| 2018 Ford Escape | SEL | - | - |
| 2017 Ford Escape | S | - | - |
| 2017 Ford Escape | SE | - | - |
| 2016 Ford Escape | S | - | - |
| 2016 Ford Escape | SE | - | - |
| 2015 Ford Escape | S | - | - |
| 2015 Ford Escape | SE | - | - |
| 2014 Ford Escape | S | - | - |
| 2014 Ford Escape | SE | - | - |
| 2013 Ford Escape | S | - | - |
| 2013 Ford Escape | SE | - | - |
| 2013 Ford Escape | SEL | - | - |
