














How to Replace Both Front Wheel Bearing Hubs on a 2014-2019 GMC Sierra 1500
Step-by-step instructions with tools, parts, torque specs, safety tips, and ABS guidance
How to Replace Both Front Wheel Bearing Hubs on a 2014-2019 GMC Sierra 1500
Step-by-step instructions with tools, parts, torque specs, safety tips, and ABS guidance for 2014, 2015, 2016, 2017, 2018, 2019


🔧 Side View Mirror Replacement
This repair replaces the complete exterior mirror assembly on your Sierra. The mirror mounts through the front upper door area, so the door trim panel has to come off to access the fasteners and wiring.
Difficulty Level: Intermediate | Estimated Time: 0.8-1.5 hours per mirror
⚠️ Safety & Precautions
- Disconnect the negative battery cable before starting if the mirror has power adjustment, heat, turn signal, or blind spot wiring.
- Support the mirror with one hand before removing the last fastener so it does not fall and scratch the paint.
- Be careful around the window glass and door panel clips; they can break if forced.
- If equipped, avoid pulling on the wiring harness by the wires.
🔧 Required Tools
You'll need the following tools for this repair:
- 7mm socket
- 10mm socket
- Ratchet
- Socket extension
- Trim panel removal tool
- Small flat-blade screwdriver
- Gloves
- Safety glasses
🔩 Required Parts
HowToo sells all the parts you need for this repair:
- Side view mirror assembly - Driver or passenger side - Qty: 1
- Mirror gasket or foam seal - Qty: 1
- Door panel clip set - Qty: 1 set
📋 Before You Begin
- Park on level ground and set the parking brake.
- Turn the ignition off.
- Disconnect the negative battery cable if the mirror is powered or heated.
- Take a photo of the door panel before removing it.
🔨 Step-by-Step Instructions
Follow these steps in order:
Step 1: Remove the door trim panel
- Use a trim panel removal tool to pry off the switch bezel and any small trim covers.
- Use a 7mm socket with a ratchet to remove the door panel screws.
- Carefully pop the door panel clips loose with the trim panel removal tool.
- Lift the panel upward to unhook it from the window ledge.
- Disconnect the electrical connectors and set the panel aside.
Step 2: Disconnect the mirror connector
- Reach the mirror connector at the front upper corner of the door.
- Press the locking tab and unplug the connector by hand.
- If the connector is tight, use a small flat-blade screwdriver to gently lift the lock tab.
Step 3: Remove the mirror assembly
- Use a 10mm socket with a ratchet and extension to remove the mirror retaining nuts.
- Hold the mirror from the outside while removing the last nut.
- Pull the mirror straight away from the door.
- Keep the studs aligned as you remove it.
Step 4: Install the new mirror
- Position the new mirror on the door and line up the studs with the holes.
- Start all retaining nuts by hand before tightening.
- Use a 10mm socket to snug the nuts evenly.
- Torque to 9 Nm (80 in-lbs) for the mirror mounting nuts.
Step 5: Reconnect the wiring
- Plug the mirror connector in until it clicks.
- Make sure the harness is routed so it cannot be pinched by the door panel.
- If equipped, confirm the heated mirror and signal connectors are fully seated.
Step 6: Reinstall the door panel
- Reconnect all electrical connectors to the door panel.
- Hang the top edge of the panel on the window ledge.
- Press the clips into place around the edge of the panel.
- Use the 7mm socket to reinstall the screws and trim pieces.
Step 7: Test the mirror
- Reconnect the battery if it was disconnected.
- Test mirror adjustment, heat, folding, turn signal, and blind spot features if equipped.
- Check for looseness, wind noise, and proper door panel fit.
✅ After Repair
- Verify the mirror moves correctly in all directions.
- Check that the mirror does not vibrate on a short road test.
- Inspect for water leaks and confirm the door panel is fully clipped in.
💰 DIY vs Shop Cost
Shop Cost: $250-$650 per mirror (parts + labor)
DIY Cost: $120-$350 per mirror (parts only)
You Save: $130-$300 by doing it yourself!
Shop labor rates vary but typically run $100-$150/hour. This repair takes a shop approximately 0.8-1.5 hours.
🎯 Ready to get started?
HowToo makes it easy: same-day/2-day shipping on every part, plus all the tools and specialty tools you need! Check out the parts and tools sections below to add everything to your cart.
🔧 Front Wheel Bearing / Hub Assembly Replacement
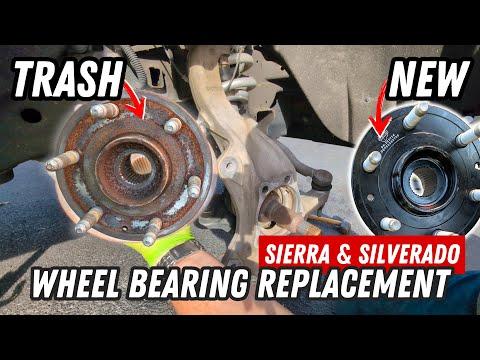
Assumption: This guide covers both front wheel bearing hub assemblies on your Sierra. On this truck, the front bearing is serviced as a complete hub assembly, not pressed apart.
The front hubs support the weight of the truck and let the wheels spin smoothly. If you hear humming, grinding, or feel play in the steering, replacing both sides together is the best way to keep the front end even.
Difficulty Level: Advanced | Estimated Time: 3-5 hours total
⚠️ Safety & Precautions
- Work on level ground and chock the rear wheels.
- Support the truck with jack stands. Do not rely on a jack alone.
- Front wheel bearings are heavy and secured tightly. Keep hands clear when removing the hub.
- Disconnect the battery if the ABS sensor connector must be moved near exposed wiring.
- Do not let the brake caliper hang by the hose.
- If equipped with ABS, handle the wheel speed sensor and harness carefully.
🔧 Required Tools
You'll need the following tools for this repair:
- Floor jack (rated 3-ton minimum)
- Jack stands
- Wheel chocks
- 21mm socket
- 24mm socket
- 15mm socket
- 18mm socket
- 10mm socket
- Ratchet
- Breaker bar
- Torque wrench
- Socket extension
- Bungee cord or caliper hanger
- Flat-blade screwdriver
- Rubber mallet
- Penetrating oil
- Gloves
- Safety glasses
🔩 Required Parts
HowToo sells all the parts you need for this repair:
- Front wheel bearing / hub assembly - Driver side - Qty: 1
- Front wheel bearing / hub assembly - Passenger side - Qty: 1
- ABS wheel speed sensor bolt or clip - Qty: 2
- Brake caliper bracket bolts - Qty: 4
- Hub mounting bolts - Qty: 6
📋 Before You Begin
- Park on level ground, set the parking brake, and chock the rear wheels.
- Loosen the front lug nuts before lifting the truck.
- Turn the steering wheel for better access if needed.
- Replace both sides together for even wear and noise reduction.
🔨 Step-by-Step Instructions
Follow these steps in order:
Step 1: Raise and secure the front of the truck
- Use a floor jack to lift the front end.
- Place jack stands under the frame and lower the truck onto them.
- Remove both front wheels with a 21mm socket.
Step 2: Remove the brake caliper and rotor
- Use an 18mm socket to remove the brake caliper bracket bolts.
- Remove the caliper and bracket as an assembly.
- Hang the caliper with a bungee cord or caliper hanger.
- Slide off the brake rotor. If it is stuck, tap it lightly with a rubber mallet.
Step 3: Disconnect the ABS sensor lead
- Use a 10mm socket if a retaining bolt is present.
- Release the ABS wire clips from the knuckle with a flat-blade screwdriver.
- Do not pull on the sensor wire itself.
Step 4: Remove the hub mounting bolts
- Use an 18mm socket with a breaker bar to remove the three hub bolts from the back of the steering knuckle.
- Spray penetrating oil on the bolt heads and hub flange if rusted.
- Use steady pressure, not impact on the bolt heads.
Step 5: Remove the wheel bearing hub assembly
- Pull the hub assembly straight out of the knuckle.
- If it is seized, tap around the hub flange with a rubber mallet.
- Clean the knuckle mounting surface before installation.
Step 6: Install the new hub assembly
- Position the new hub in the knuckle and align the bolt holes.
- Install the hub bolts by hand first.
- Use an 18mm socket and torque wrench to tighten the hub bolts.
- Torque to 175 Nm (129 ft-lbs) for the hub mounting bolts.
Step 7: Reconnect the ABS wiring
- Reinstall the ABS sensor wire clips and bolt if equipped.
- Make sure the wire is routed away from the tire and suspension.
- Check that the connector is fully locked in place.
Step 8: Reinstall the rotor, caliper, and wheel
- Install the brake rotor.
- Reinstall the caliper bracket using an 18mm socket.
- Torque to 190 Nm (140 ft-lbs) for the caliper bracket bolts.
- Reinstall the wheel and snug the lug nuts with a 21mm socket.
- Torque to 190 Nm (140 ft-lbs) for the wheel lug nuts in a star pattern.
Step 9: Repeat on the other side
- Repeat the same steps for the opposite front wheel bearing.
- Use the same torque specs and installation steps.
Step 10: Final check
- Lower the truck off the jack stands.
- Pump the brake pedal until it feels firm.
- Spin each front wheel by hand and check for rubbing or noise.
✅ After Repair
- Road test at low speed first and listen for noise.
- Check ABS warning lights after driving.
- Recheck lug nut torque after 25-50 miles.
- Confirm there is no wheel play by rocking each front tire at the 12 and 6 o'clock positions.
💰 DIY vs Shop Cost
Shop Cost: $700-$1,500 for both front hubs (parts + labor)
DIY Cost: $260-$700 for both front hubs (parts only)
You Save: $440-$800 by doing it yourself!
Shop labor rates vary but typically run $100-$150/hour. This repair takes a shop approximately 3-5 hours total.
🎯 Ready to get started?
HowToo makes it easy: same-day/2-day shipping on every part, plus all the tools and specialty tools you need! Check out the parts and tools sections below to add everything to your cart.
Guide for Wheel Bearing and Hub Assembly replace for these GMC vehicles
| Year Make Model | Sub Model | Engine | Body Style |
|---|---|---|---|
| 2019 GMC Sierra 1500 | - | - | - |
| 2018 GMC Sierra 1500 | - | - | - |
| 2017 GMC Sierra 1500 | - | - | - |
| 2016 GMC Sierra 1500 | - | - | - |
| 2015 GMC Sierra 1500 | - | - | - |
| 2014 GMC Sierra 1500 | - | - | - |