















How to Replace and Register the Battery on a 2011-2024 BMW X3 (AGM, F25) (Engine: Inline 4 2.0L)
Step-by-step cargo-area battery swap with tools, safety tips, torque specs, and OBD2 battery registration/coding guidance
How to Replace and Register the Battery on a 2011-2024 BMW X3 (AGM, F25) (Engine: Inline 4 2.0L)
Step-by-step cargo-area battery swap with tools, safety tips, torque specs, and OBD2 battery registration/coding guidance for 2011, 2012, 2013, 2014, 2015, 2016, 2017, 2018, 2019, 2020, 2021, 2022, 2023, 2024


🔧 X3 - Battery Replacement
On your X3, the battery is in the rear cargo area. The job is mostly trim removal and safe disconnection/reconnection, but the critical final step is battery registration (telling the car a new battery is installed) so charging works correctly and the battery lasts.
Difficulty Level: Intermediate | Estimated Time: 0.75-1.5 hours
Assumption: Common F25 X3 setup with AGM battery in cargo area.
⚠️ Safety & Precautions
- ⚠️ Wear eye protection and gloves; batteries can vent acid and explosive gas.
- ⚠️ Keep metal tools off the positive terminal; a short can cause burns/fire.
- ⚠️ Always disconnect negative (-) first and reconnect it last.
- ⚠️ Do not pull or pry on the IBS (Intelligent Battery Sensor) on the negative cable; it’s a sensor the car uses to manage charging.
- ⚠️ Battery registration is required after replacement; skipping it can cause warning lights and shorten battery life.
🔧 Required Tools
You'll need the following tools for this repair:
- 10mm socket
- 13mm socket
- 3/8" ratchet
- 6" socket extension
- Trim removal tool set
- Torque wrench (5–30 Nm range)
- Battery terminal puller (specialty)
- OBD2 scan tool with BMW battery registration (specialty)
- Gloves (chemical-resistant)
- Safety glasses
- Shop towels
🔩 Required Parts
HowToo sells all the parts you need for this repair:
- AGM car battery (same group size and Ah rating as original) - Qty: 1
- Battery vent tube elbow/grommet (if brittle or damaged) - Qty: 1
- Battery hold-down bolt(s) (optional if corroded) - Qty: 1
📋 Before You Begin
- Park on level ground, shift to Park, and remove the key/fob from the vehicle.
- Open the rear hatch and keep it open while you work.
- Wait 5–10 minutes with the car off so control modules go to “sleep.” Prevents electrical glitches.
- If you want to preserve radio presets, use an OBD memory saver; otherwise expect to reset clock and one-touch windows.
🔨 Step-by-Step Instructions
Follow these steps in order:
Step 1: Access the battery in the cargo area
- Lift the rear cargo floor panel by hand.
- Use a trim removal tool set to remove the right-side cargo trim cover/panel that hides the battery.
- Set clips/panels aside so they don’t get stepped on.
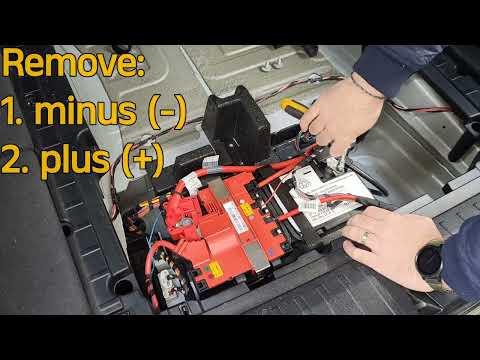
Step 2: Disconnect the negative (-) terminal first
- Locate the negative cable (usually black) and the IBS (a small sensor block on the negative cable).
- Use a 10mm socket with 3/8" ratchet to loosen the negative terminal clamp nut.
- Lift the negative clamp straight up off the battery post. If it’s stuck, use a battery terminal puller (specialty) (it gently presses the clamp off without prying).
- Move the negative cable aside so it cannot spring back and touch the battery.
Step 3: Disconnect the positive (+) terminal
- Open the red protective cover over the positive terminal.
- Use a 10mm socket to loosen the positive terminal clamp nut.
- Remove the positive clamp and position it safely away from the battery.
Step 4: Remove the battery vent tube
- On AGM batteries, a small vent tube connects to the side of the battery to route gas outside the vehicle.
- Pull the vent tube straight out by hand. Use shop towels to keep dirt out of the tube.
Step 5: Remove the battery hold-down bracket
- At the base of the battery, locate the hold-down bracket.
- Use a 13mm socket with 6" socket extension and 3/8" ratchet to remove the hold-down bolt.
- Remove the bracket and keep it with the bolt.
Step 6: Remove the old battery
- Batteries are heavy. Get a solid grip and lift straight up and out.
- Set the old battery upright on the ground. Don’t tip it.
Step 7: Install the new battery
- Place the new AGM battery into the tray in the same orientation as the old one.
- Reinstall the hold-down bracket using a 13mm socket and snug it down evenly.
- Torque to 24 Nm (18 ft-lbs) for the battery hold-down bolt.
- Reconnect the vent tube by pushing it fully into the battery vent port.
Step 8: Reconnect terminals (positive first, negative last)
- Install the positive (+) terminal first and tighten using a 10mm socket.
- Torque to 5 Nm (44 in-lbs) for the terminal clamp nut.
- Close the red protective cover.
- Install the negative (-) terminal last and tighten using a 10mm socket.
- Torque to 5 Nm (44 in-lbs) for the terminal clamp nut.
Step 9: Reinstall cargo trim and floor
- Reinstall the right-side trim cover using the trim removal tool set to line up clips without breaking them.
- Reinstall the cargo floor panel.
Step 10: Register the new battery (required)
- Plug in your OBD2 scan tool with BMW battery registration (specialty) to the OBD port (driver footwell).
- Follow the tool prompts for Battery Registration (sometimes listed as “Register battery replacement”).
- If the new battery is a different type (AGM vs non-AGM) or different Ah capacity, the car may need battery coding (a settings update), not just registration.
✅ After Repair
- Start the engine and confirm no battery/charging warnings appear.
- Check that the rear hatch closes smoothly and no trim is loose.
- Reset one-touch windows if needed: hold the window switch up for ~5 seconds after fully closed.
- If any warning lights remain, use the OBD2 scan tool to read/clear faults after registration.
💰 DIY vs Shop Cost
Shop Cost: $450-$900 (parts + labor)
DIY Cost: $220-$450 (parts only)
You Save: $230-$450 by doing it yourself!
Shop labor rates vary but typically run $100-$150/hour. This repair takes a shop approximately 0.8-1.2 hours.
🎯 Ready to get started?
HowToo makes it easy: same-day/2-day shipping on every part, plus all the tools and specialty tools you need! Check out the parts and tools sections below to add everything to your cart.
Guide for Vehicle Battery replace for these BMW vehicles
| Year Make Model | Sub Model | Engine | Body Style |
|---|---|---|---|
| 2024 BMW X3 | - | Inline 6 3.0L | - |
| 2024 BMW X3 | - | Inline 4 2.0L | - |
| 2023 BMW X3 | - | Inline 6 3.0L | - |
| 2023 BMW X3 | - | Inline 4 2.0L | - |
| 2022 BMW X3 | - | Inline 6 3.0L | - |
| 2022 BMW X3 | - | Inline 4 2.0L | - |
| 2021 BMW X3 | - | Inline 6 3.0L | - |
| 2021 BMW X3 | - | Inline 4 2.0L | - |
| 2020 BMW X3 | - | Inline 6 3.0L | - |
| 2020 BMW X3 | - | Inline 4 2.0L | - |
| 2019 BMW X3 | - | Inline 6 3.0L | - |
| 2019 BMW X3 | - | Inline 4 2.0L | - |
| 2018 BMW X3 | - | Inline 6 3.0L | - |
| 2018 BMW X3 | - | Inline 4 2.0L | - |
| 2017 BMW X3 | - | Inline 6 3.0L | - |
| 2017 BMW X3 | - | Inline 4 2.0L | - |
| 2016 BMW X3 | - | Inline 6 3.0L | - |
| 2016 BMW X3 | - | Inline 4 2.0L | - |
| 2015 BMW X3 | - | Inline 6 3.0L | - |
| 2015 BMW X3 | - | Inline 4 2.0L | - |
| 2014 BMW X3 | - | Inline 6 3.0L | - |
| 2014 BMW X3 | - | Inline 4 2.0L | - |
| 2013 BMW X3 | - | Inline 6 3.0L | - |
| 2013 BMW X3 | - | Inline 4 2.0L | - |
| 2012 BMW X3 | - | Inline 6 3.0L | - |
| 2011 BMW X3 | - | Inline 6 3.0L | - |