


How to Replace and Register the 12V Battery on a 2016 Audi A6 (AGM, Trunk-Mounted)
Step-by-step DIY instructions with required tools/parts, safety tips, and battery adaptation coding via OBD2
How to Replace and Register the 12V Battery on a 2016 Audi A6 (AGM, Trunk-Mounted)
Step-by-step DIY instructions with required tools/parts, safety tips, and battery adaptation coding via OBD2


🔧 A6 - Battery Replacement
Your A6’s 12V battery powers starting and all electronics. Replacing it is straightforward, but this car’s charging system is “smart,” so the new battery should be registered (coded) so it charges correctly and lasts longer.
Difficulty Level: Beginner | Estimated Time: 0.5-1.0 hours
⚠️ Safety & Precautions
- ⚠️ Wear gloves and safety glasses; batteries can leak acid and spark.
- ⚠️ Turn ignition OFF, remove the key/fob from the car, and keep it away from the vehicle.
- ⚠️ Disconnect negative (-) first and reconnect negative (-) last to reduce short-circuit risk.
- ⚠️ The battery is heavy—lift with your legs, not your back.
- ⚠️ Do not let tools bridge the battery positive terminal to body metal.
🔧 Required Tools
You'll need the following tools for this repair:
- 10mm socket
- 13mm socket
- 3/8" ratchet
- 6" socket extension
- Trim removal tool
- Torque wrench (5-60 Nm range)
- Battery terminal puller (specialty)
- OBD2 scan tool with Audi battery adaptation (specialty)
- Battery memory saver (OBD-II) (specialty)
- Work light
- Nitrile gloves
- Safety glasses
🔩 Required Parts
HowToo sells all the parts you need for this repair:
- 12V AGM battery (H8 / Group 49, match original Ah/CCA) - Qty: 1
- Battery vent elbow/tube (if damaged or missing) - Qty: 1
- Battery terminal protectant - Qty: 1
📋 Before You Begin
- 🅿️ Park on level ground, shift to Park, and set the parking brake.
- Open the trunk and keep it open while you work (don’t rely on the car staying “awake”).
- If you use a battery memory saver (a device that keeps power to memories through the OBD port), connect it now per its instructions.
- Tip: Take a photo of the battery label first.
🔨 Step-by-Step Instructions
Follow these steps in order:
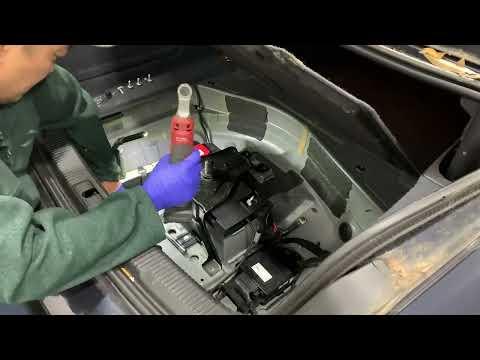
Step 1: Access the battery in the trunk
- Open the trunk and remove the right-side trunk floor/side trim panels using a trim removal tool.
- Set clips and panels aside so they don’t get lost.
Step 2: Disconnect the negative (-) terminal
- Locate the negative (-) terminal (usually marked with “-” and/or black cable).
- Loosen the clamp using a 10mm socket and 3/8" ratchet.
- Lift the clamp off the post. If it’s stuck, use a battery terminal puller (specialty). (This tool safely pulls a tight clamp without prying.)
- Tuck the negative cable aside so it cannot spring back and touch the post.
Step 3: Disconnect the positive (+) terminal
- Loosen the positive (+) terminal clamp using a 10mm socket and 3/8" ratchet.
- Remove the clamp and position it so it cannot touch metal.
Step 4: Remove the battery hold-down
- Find the battery hold-down bracket at the base of the battery.
- Remove the hold-down bolt using a 13mm socket, 6" extension, and 3/8" ratchet.
- Keep the bolt and bracket together.
Step 5: Disconnect the battery vent tube
- Pull the small vent tube off the battery using your hand (no tool needed).
- This tube routes battery gases outside the trunk—don’t skip reconnecting it.
Step 6: Remove the old battery
- Lift the battery straight up and out. Use a steady two-hand grip.
- Place it upright in a safe spot.
Step 7: Install the new battery
- Set the new AGM battery into the tray in the same orientation as the old one.
- Reconnect the vent tube by pushing it fully onto the vent port.
- Reinstall the hold-down bracket and tighten the bolt with a 13mm socket, then Torque to 20 Nm (15 ft-lbs) using a torque wrench.
Step 8: Reconnect terminals (positive first)
- Install the positive (+) clamp first and tighten using a 10mm socket, then Torque to 6 Nm (53 in-lbs) using a torque wrench.
- Install the negative (-) clamp last and tighten using a 10mm socket, then Torque to 6 Nm (53 in-lbs) using a torque wrench.
- Apply a light coat of battery terminal protectant to help prevent corrosion.
Step 9: Register (adapt) the new battery
- Connect your OBD2 scan tool with Audi battery adaptation (specialty) to the OBD port.
- Follow the scan tool prompts for Battery adaptation / Battery replacement and enter the new battery details (AGM type and capacity/Ah as required).
- Tip: Registering helps correct charging and battery life.
- If you cannot register today, the car will still run, but the charging strategy may be incorrect until it’s adapted.
Step 10: Reinstall trunk trim
- Reinstall all trunk panels and clips using your hands and the trim removal tool as needed.
✅ After Repair
- Start the engine and confirm there are no warning messages related to low voltage.
- Check that the trunk lights and interior electronics work normally.
- Reset the clock and one-touch windows if needed (hold the window switch up for a few seconds after fully closed).
- Dispose of the old battery properly—most parts stores take it for recycling.
💰 DIY vs Shop Cost
Shop Cost: $350-$650 (parts + labor + registration)
DIY Cost: $180-$350 (parts only)
You Save: $170-$300 by doing it yourself!
Shop labor rates vary but typically run $100-$150/hour. This repair takes a shop approximately 0.5-1.0 hours.
🎯 Ready to get started?
HowToo makes it easy: same-day/2-day shipping on every part, plus all the tools and specialty tools you need! Check out the parts and tools sections below to add everything to your cart.
