


How to Diagnose & Replace the EPAS Steering Rack on a 2014 Ford Escape (No Pump)
Step-by-step electric power steering assist fault troubleshooting, tools/parts list, and calibration tips
How to Diagnose & Replace the EPAS Steering Rack on a 2014 Ford Escape (No Pump)
Step-by-step electric power steering assist fault troubleshooting, tools/parts list, and calibration tips
🔧 Escape - Power Steering “Pump” Clarification & Electric Steering Gear Replacement
Your Escape does not use a hydraulic power steering pump. It uses EPAS (Electric Power Assisted Steering), where an electric motor and control module provide steering assist—so there’s no pump, belt drive, or power steering fluid to replace.
If you’re losing assist, hearing noises, or have a steering warning light, the repair is usually diagnosis/repair of the EPAS steering gear (rack) / wiring / fuses / battery charging, not a pump swap.
Difficulty Level: Advanced | Estimated Time: 6-10 hours
⚠️ Safety & Precautions
- ⚠️ Disconnect the battery before steering/airbag-area work; steering angle sensors can be damaged.
- ⚠️ Support the vehicle securely; the steering gear removal is done under the front of your Escape.
- ⚠️ Do not let the steering wheel spin freely with the steering shaft disconnected (can damage the clockspring—an internal ribbon cable in the steering wheel).
- ⚠️ An alignment is required after steering gear removal/installation.
- ⚠️ EPAS may require a scan tool calibration (steering angle/center learn) after installation.
🔧 Required Tools
You'll need the following tools for this repair:
- Safety glasses
- Mechanic gloves
- Floor jack (rated 3-ton minimum)
- Jack stands (rated 3-ton minimum)
- Wheel chocks
- 1/2" drive breaker bar
- 1/2" drive torque wrench (20-200 ft-lb range)
- 3/8" drive ratchet
- 3/8" drive torque wrench (10-80 ft-lb range)
- Socket set (8mm-21mm)
- Deep socket set (13mm-21mm)
- Wrench set (10mm-21mm)
- Torx bit set (T20-T50)
- E-Torx socket set (E8-E14)
- Pry bar (12")
- Pick tool
- Flat-blade screwdriver
- Needle-nose pliers
- Tie rod end puller (specialty)
- Paint marker
- Work light
- OBD2 scan tool with Ford EPAS functions (specialty)
🔩 Required Parts
HowToo sells all the parts you need for this repair:
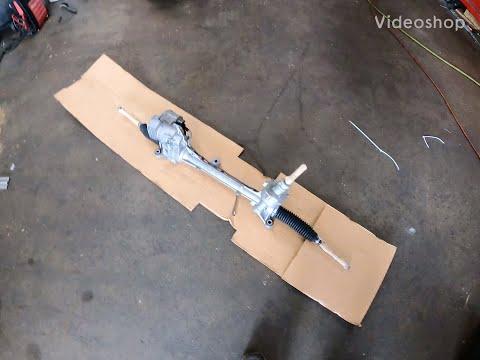
- Electric power steering gear (EPAS steering rack assembly) - Qty: 1
- Front inner tie rods - Qty: 2 Replace in pairs
- Front outer tie rod ends - Qty: 2 Replace in pairs
- Steering gear mounting bolts - Qty: 1 set Use new if required
- Subframe bolts - Qty: 1 set Use new if required
📋 Before You Begin
- Park on level ground, wheels straight, and set the parking brake.
- Use wheel chocks behind the rear wheels.
- Disconnect the battery using a 10mm socket (negative terminal first), then wait 5 minutes.
- Center the steering wheel and mark the steering shaft relationship with a paint marker (this helps keep alignment close).
- Plan for a professional alignment immediately after.
🔨 Step-by-Step Instructions
Follow these steps in order:
Step 1: Confirm you don’t have a hydraulic pump
- Open the hood and look for a power steering fluid reservoir—your Escape should have none.
- Look down the front of the engine for a belt-driven pump—your Escape should not have one.
- If you see a fluid reservoir, tell me.
Step 2: Raise and support the front
- Loosen the front lug nuts slightly using a breaker bar and correct-size socket.
- Lift the front with a floor jack and support with jack stands under safe lift points.
- Remove both front wheels using a socket and ratchet.
Step 3: Disconnect outer tie rod ends from the knuckles
- Remove the tie rod end nut using the correct-size socket.
- Separate the tie rod end with a tie rod end puller (specialty). (A puller presses the joint apart without hammering.)
- Count the turns when removing the outer tie rod from the inner tie rod using wrenches; write it down for both sides.
Step 4: Disconnect the steering intermediate shaft from the steering gear
- From the driver footwell or underbody access (depending on configuration), locate the pinch bolt at the coupling.
- Mark the shaft and coupling with a paint marker.
- Remove the pinch bolt using the correct socket or E-Torx socket (varies by build).
- Slide the shaft off the steering gear input. Use a pry bar carefully if it’s stuck.
Step 5: Unplug EPAS electrical connectors
- Locate the steering gear electrical connector(s) on the rack.
- Release locks using a pick tool and flat-blade screwdriver, then unplug.
- Inspect for corrosion or water intrusion before installing the new unit.
Step 6: Create clearance (subframe/brace as needed)
- Remove any underbody shields using a socket or Torx bit (varies).
- Depending on your Escape’s layout, you may need to lower the front subframe slightly for rack removal.
- Support the subframe with a floor jack before loosening bolts.
Step 7: Remove the steering gear
- Remove steering gear mounting bolts using the correct socket or E-Torx socket.
- Work the rack out through the driver-side wheel well area; use a pry bar gently for positioning.
- Go slow—avoid tearing CV axle boots.
Step 8: Transfer/replace tie rod components (if applicable)
- If your new steering gear does not include inner tie rods, remove old inner tie rods using a wrench and appropriate socket.
- Install new inner tie rods and then install outer tie rod ends by the same turn-count you recorded using wrenches.
Step 9: Install the new steering gear
- Position the new rack into place and start mounting bolts by hand.
- Tighten mounting bolts using a torque wrench to the exact Ford specification for your Escape’s steering gear fasteners.
- Reconnect EPAS connector(s) until locks click.
Step 10: Reconnect the steering shaft
- Align your paint marks and slide the intermediate shaft onto the rack input.
- Install the pinch bolt and tighten with a torque wrench to the exact Ford specification.
- If the marks don’t line up, stop and re-check centering.
Step 11: Reconnect tie rods to the knuckles
- Install tie rod studs into the knuckles and install nuts using the correct socket.
- Tighten using a torque wrench to the exact Ford specification.
Step 12: Reassemble and reinstall wheels
- Reinstall shields/braces using a socket or Torx bit.
- Reinstall wheels and snug lug nuts using a socket.
- Lower the vehicle and torque lug nuts in a star pattern using a torque wrench to the exact Ford specification.
Step 13: Battery reconnect and EPAS calibration
- Reconnect the battery using a 10mm socket (positive first if removed, negative last).
- Use an OBD2 scan tool with Ford EPAS functions (specialty) to run steering angle/center calibration if required.
- Clear codes and confirm no EPAS/AdvanceTrac warnings return.
✅ After Repair
- Start your Escape and verify steering assist is present with the vehicle stationary.
- Turn lock-to-lock slowly while stopped and listen for binding or clunks.
- Road test carefully at low speed; confirm the steering wheel is close to centered.
- Get a professional 4-wheel alignment immediately.
- If any EPAS/traction control lights remain on, scan and perform required calibrations.
💰 DIY vs Shop Cost
Shop Cost: $1,800-$3,200 (parts + labor)
DIY Cost: $900-$2,200 (parts only)
You Save: $900-$1,500 by doing it yourself!
Shop labor rates vary but typically run $100-$150/hour. This repair takes a shop approximately 6-10 hours.
🎯 Ready to get started?
HowToo makes it easy: same-day/2-day shipping on every part, plus all the tools and specialty tools you need! Check out the parts and tools sections below to add everything to your cart.
Quick check so I can tailor this perfectly (pick one):
- 🧭 Are you trying to fix a “Power Steering Assist Fault” message / steering warning light, or are you hearing a noise?
- 🔍 Do you have any steering-related codes (even basic OBD codes), and do you have access to a scan tool that can run EPAS/SAS calibrations?
Guide for replace for these Ford vehicles
| Year Make Model | Sub Model | Engine | Body Style |
|---|
