












How to Diagnose and Replace the Timing Chain on a 2016-2021 Hyundai Tucson (Engine: Inline 4 2.0L)
Step-by-step guide covering timing belt confusion, chain repair, tools, parts, and safety tips
How to Diagnose and Replace the Timing Chain on a 2016-2021 Hyundai Tucson (Engine: Inline 4 2.0L)
Step-by-step guide covering timing belt confusion, chain repair, tools, parts, and safety tips for 2016, 2017, 2018


🔧 Tucson - Timing Drive Inspection
Your Tucson does not use a replaceable rubber timing belt. The 2.0L gasoline engine uses an internal timing chain, which is designed to last much longer and is not a normal maintenance replacement item.
If you are hearing rattling, have cam/crank correlation codes, or suspect timing problems, the correct repair is timing chain diagnosis and possible timing chain component replacement.
Difficulty Level: Advanced | Estimated Time: 8-12 hours
⚠️ Safety & Precautions
- ⚠️ Do not attempt to “replace a timing belt” on your Tucson because there is no serviceable timing belt.
- ⚠️ Timing chain service requires exact engine timing. Incorrect timing can cause severe engine damage.
- ⚠️ Disconnect the negative battery cable before removing engine covers or working near the accessory drive.
- ⚠️ Support the engine properly before removing any engine mount. An engine support bar holds the engine safely from above.
- ⚠️ Never rotate the crankshaft or camshafts independently after the chain is removed.
- ⚠️ Work only on a cold engine to avoid burns from coolant, oil, and exhaust components.
🔧 Required Tools
You'll need the following tools for this repair:
- 10mm socket
- 12mm socket
- 14mm socket
- 17mm socket
- 19mm socket
- 22mm socket
- 3/8-inch ratchet
- 1/2-inch breaker bar
- 3/8-inch torque wrench
- 1/2-inch torque wrench
- Metric wrench set 10mm-19mm
- Serpentine belt tool (specialty)
- Crankshaft pulley holding tool (specialty)
- Harmonic balancer puller (specialty)
- Engine support bar (specialty)
- Floor jack (rated 3-ton minimum)
- Jack stands (rated 3-ton minimum)
- Wheel chocks
- Plastic trim clip remover
- Gasket scraper plastic blade
- Drain pan 10-quart minimum
- Shop towels
- Safety glasses
- Nitrile gloves
🔩 Required Parts
HowToo sells all the parts you need for this repair:
- Timing chain kit - Qty: 1
- Timing chain tensioner - Qty: 1
- Timing chain guides - Qty: 1 set
- Front timing cover sealant - Qty: 1
- Valve cover gasket - Qty: 1
- Crankshaft front oil seal - Qty: 1
- Engine coolant - Qty: As needed
- Engine oil 5W-20 synthetic blend or full synthetic - Qty: 5 quarts
- Oil filter - Qty: 1
- Serpentine belt - Qty: 1
📋 Before You Begin
- Park your Tucson on level ground and let the engine cool fully.
- Set the parking brake and place wheel chocks behind the rear wheels.
- Disconnect the negative battery cable with a 10mm socket.
- Lift the front of the vehicle with a floor jack rated 3-ton minimum and support it with jack stands rated 3-ton minimum.
- Take photos before removing parts. This helps during reassembly.
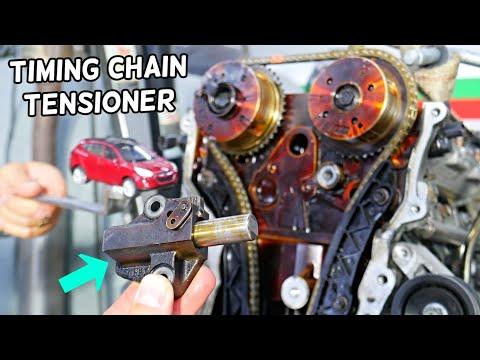
- A timing chain tensioner keeps the chain tight while the engine runs. If it fails, the chain can rattle or jump timing.
🔨 Step-by-Step Instructions
Follow these steps in order:
Step 1: Verify This Is a Timing Chain Job
- Use an OBD-II scan tool if available and check for timing-related codes such as camshaft/crankshaft correlation faults.
- Listen near the front timing cover during cold start. A brief or constant metallic rattle can point to chain, guide, or tensioner wear.
- If there is no rattle, no timing code, and no running issue, do not replace timing parts as maintenance.
- Tip: Timing chains are not routine service items.
Step 2: Remove Engine Covers and Intake Ducting
- Use a 10mm socket to remove the engine cover fasteners if equipped.
- Use a plastic trim clip remover to release intake duct clips.
- Use a 10mm socket to loosen air duct clamps and move the duct aside.
Step 3: Drain Engine Oil and Coolant
- Place a 10-quart drain pan under the engine.
- Use a 17mm socket to remove the engine oil drain plug.
- Drain the oil completely, then reinstall the drain plug and torque to 34-44 Nm (25-33 ft-lbs).
- Drain coolant into the 10-quart drain pan using the radiator drain if accessible.
Step 4: Remove the Right Front Wheel and Splash Shield
- Use a 21mm socket if your lug nuts are factory size and loosen the right front lug nuts before lifting if not already raised.
- Use the floor jack rated 3-ton minimum and jack stands rated 3-ton minimum to safely support the vehicle.
- Use a plastic trim clip remover and 10mm socket to remove the right-side splash shield.
- Reinstallation note: wheel lug nuts typically torque to 88-107 Nm (65-79 ft-lbs).
Step 5: Remove the Serpentine Belt
- Use a serpentine belt tool (specialty) to rotate the belt tensioner and release belt tension.
- Slide the serpentine belt off the pulleys and remove it.
- Draw a quick belt routing picture before removal if the underhood label is missing.
- Tip: Replace the belt if cracked or glazed.
Step 6: Support the Engine
- Install an engine support bar (specialty) across the strut towers.
- Attach the support hook to a safe engine lifting point and apply light tension.
- Do not lift the engine hard. Just support its weight.
Step 7: Remove the Right Engine Mount
- Use a 14mm socket and 17mm socket to remove the right engine mount fasteners.
- Keep bolts organized by location because lengths may differ.
- On reassembly, tighten engine mount fasteners to the OEM service spec for your Tucson. If exact fastener type is unknown, do not guess.
Step 8: Remove the Crankshaft Pulley
- Use a crankshaft pulley holding tool (specialty) to keep the pulley from turning.
- Use a 22mm socket and 1/2-inch breaker bar to loosen the crankshaft pulley bolt.
- Use a harmonic balancer puller (specialty) to remove the pulley if it does not slide off by hand.
- Do not pry against the timing cover sealing surface.
Step 9: Remove the Valve Cover
- Use a 10mm socket to remove ignition coil fasteners and move the coils aside.
- Use a 10mm socket to remove valve cover bolts.
- Lift the valve cover straight up and remove the old valve cover gasket.
- Use a plastic gasket scraper to clean gasket surfaces gently.
Step 10: Remove the Front Timing Cover
- Use 10mm socket, 12mm socket, and 14mm socket as needed to remove timing cover bolts.
- Note each bolt location before removal.
- Use a plastic gasket scraper to separate the cover carefully.
- Do not gouge the aluminum surface. Gouges can cause oil leaks.
Step 11: Set Engine to Top Dead Center
- Use a 22mm socket on the crankshaft bolt to rotate the engine clockwise only.
- Align the crankshaft and camshaft timing marks exactly according to the chain mark layout.
- Top Dead Center means piston number 1 is at the top of its compression stroke.
- Paint-mark the old chain and sprockets before removal as a backup reference.
Step 12: Remove the Timing Chain Tensioner, Guides, and Chain
- Use a 10mm socket or 12mm socket to remove timing chain guide bolts.
- Use the correct socket to remove the timing chain tensioner bolts.
- Remove the chain only after all timing marks are confirmed aligned.
- Do not rotate the camshafts or crankshaft after the chain is removed.
Step 13: Install the New Timing Chain Components
- Install the new timing chain with the colored chain links aligned to the camshaft and crankshaft timing marks.
- Use a 10mm socket or 12mm socket to install the new guides and tensioner.
- Torque small timing guide and tensioner bolts to the OEM service spec for your Tucson. If the exact bolt class is unknown, do not guess.
- Release the new tensioner only after the chain and marks are fully aligned.
Step 14: Rotate Engine by Hand and Recheck Timing
- Use a 22mm socket to rotate the crankshaft clockwise two full turns.
- Stop if you feel hard resistance. Do not force it.
- Recheck that the crankshaft and camshaft timing marks return to the correct positions.
- If marks are off, remove the chain and correct the alignment before reassembly.
Step 15: Reinstall the Timing Cover
- Use a plastic gasket scraper and shop towels to clean all sealing surfaces.
- Apply front timing cover sealant in the correct bead path around the cover.
- Use 10mm socket, 12mm socket, and 14mm socket to reinstall timing cover bolts.
- Tighten bolts evenly in stages. Use OEM torque specifications for each bolt size.
Step 16: Reinstall Valve Cover and Crankshaft Pulley
- Install the new valve cover gasket.
- Use a 10mm socket to install valve cover bolts and tighten evenly.
- Install the crankshaft pulley by hand.
- Use a crankshaft pulley holding tool (specialty), 22mm socket, and 1/2-inch torque wrench to tighten the crankshaft pulley bolt to the OEM service spec.
Step 17: Reinstall Engine Mount, Belt, and Shields
- Use a 14mm socket and 17mm socket to reinstall the right engine mount.
- Use a serpentine belt tool (specialty) to route the serpentine belt over the pulleys.
- Use a plastic trim clip remover and 10mm socket to reinstall the splash shield.
- Use a 21mm socket to reinstall the wheel and torque lug nuts to 88-107 Nm (65-79 ft-lbs).
Step 18: Refill Oil and Coolant
- Install a new oil filter by hand until the gasket contacts, then tighten about 3/4 turn more.
- Add the correct amount of 5W-20 engine oil.
- Refill the cooling system with the proper engine coolant.
- Reconnect the negative battery cable with a 10mm socket.
✅ After Repair
- Start the engine and let it idle. Listen for abnormal chain rattle, knocking, or scraping.
- Check around the timing cover, valve cover, oil filter, and drain plug for leaks.
- Watch the temperature gauge and confirm the engine does not overheat.
- Top off coolant after the thermostat opens and air purges from the system.
- After the test drive, recheck engine oil level and coolant level.
- If the check engine light comes on, scan for codes before driving farther.
💰 DIY vs Shop Cost
Shop Cost: $1,400-$2,400 (parts + labor)
DIY Cost: $300-$750 (parts only)
You Save: $1,100-$1,650 by doing it yourself!
Shop labor rates vary but typically run $100-$150/hour. This repair takes a shop approximately 8-12 hours.
🎯 Ready to get started?
HowToo makes it easy: same-day/2-day shipping on every part, plus all the tools and specialty tools you need! Check out the parts and tools sections below to add everything to your cart.
Guide for Engine Timing Chain Kit replace for these Hyundai vehicles
| Year Make Model | Sub Model | Engine | Body Style |
|---|---|---|---|
| 2021 Hyundai Tucson | - | Inline 4 2.0L | - |
| 2021 Hyundai Tucson | - | Inline 4 2.4L | - |
| 2020 Hyundai Tucson | - | Inline 4 2.0L | - |
| 2020 Hyundai Tucson | - | Inline 4 2.4L | - |
| 2019 Hyundai Tucson | - | Inline 4 2.0L | - |
| 2019 Hyundai Tucson | - | Inline 4 2.4L | - |
| 2018 Hyundai Tucson | - | Inline 4 1.6L | - |
| 2018 Hyundai Tucson | - | Inline 4 2.0L | - |
| 2018 Hyundai Tucson | - | Inline 4 2.4L | - |
| 2017 Hyundai Tucson | - | Inline 4 1.6L | - |
| 2017 Hyundai Tucson | - | Inline 4 2.0L | - |
| 2016 Hyundai Tucson | - | Inline 4 1.6L | - |
| 2016 Hyundai Tucson | - | Inline 4 2.0L | - |