


2016 Nissan Versa 1.6L Timing Chain Replacement Guide (Timing Belt vs Chain Explained)
Step-by-step timing chain service with required tools, parts list, timing marks, torque specs, and safety tips for 2015, 2016, 2017
2016 Nissan Versa 1.6L Timing Chain Replacement Guide (Timing Belt vs Chain Explained)
Step-by-step timing chain service with required tools, parts list, timing marks, torque specs, and safety tips for 2015, 2016, 2017
🔧 Versa - Timing Belt Replacement
Your Versa’s 1.6L engine uses a timing chain, not a timing belt. That means there is no routine “timing belt replacement” interval—chains are designed to last a long time and are typically only replaced if they’re noisy, stretched, or a related part fails (tensioner/guides).
Difficulty Level: Advanced | Estimated Time: 6-10 hours
Assumption: stock 1.6L timing chain service (HR16DE).
⚠️ Safety & Precautions
- ⚠️ Work on a cold engine; hot coolant/oil can burn.
- ⚠️ Support the engine before removing the right-side engine mount.
- ⚠️ Disconnect the negative battery cable to prevent accidental cranking.
- ⚠️ Keep sealant and debris out of the oil passages when resealing the timing cover.
- ⚠️ If timing is set wrong, the engine may not run and can be damaged—double-check timing marks.
🔧 Required Tools
You'll need the following tools for this repair:
- Safety glasses
- Nitrile gloves
- Wheel chocks
- Floor jack (rated 2-ton minimum)
- Jack stands (rated 2-ton minimum)
- Engine support bar (specialty)
- Hydraulic jack with wood block
- Metric socket set 8mm-19mm
- 1/4" drive ratchet
- 3/8" drive ratchet
- 1/2" drive breaker bar
- Torque wrench (10-200 Nm range)
- Torque angle gauge (specialty)
- Metric combination wrench set 8mm-19mm
- Phillips screwdriver #2
- Flat trim tool
- Needle-nose pliers
- Drain pan (10-quart minimum)
- Funnel
- Razor scraper
- Plastic scraper
- Brake cleaner spray
- Crankshaft pulley puller (specialty)
- Crank pulley holding tool (specialty)
- Serpentine belt tool 14mm
- OBD2 scan tool
🔩 Required Parts
HowToo sells all the parts you need for this repair:
- Timing chain kit (chain + guides + tensioner) - Qty: 1
- Front timing cover sealant (RTV silicone, OEM-equivalent) - Qty: 1
- Crankshaft front oil seal - Qty: 1
- Valve cover gasket - Qty: 1
- Engine coolant (Asian vehicle blue, 50/50 premix) - Qty: 2 gallons
- Engine oil (0W-20 full synthetic) - Qty: 4 quarts
- Oil filter - Qty: 1
- Serpentine belt - Qty: 1
- Brake cleaner - Qty: 1
- Shop towels - Qty: 1
📋 Before You Begin
- Park on level ground, set the parking brake, and place wheel chocks behind the rear wheels.
- Disconnect the battery with a 10mm socket (negative cable first).
- Raise the front and support with a floor jack and jack stands.
- Plan for downtime: the timing cover reseal needs clean surfaces and careful assembly.
- Uncommon tool note: A crankshaft pulley puller is a tool that pulls the pulley off evenly without prying.
🔨 Step-by-Step Instructions
Follow these steps in order:
Step 1: Drain fluids
- Place a drain pan under the radiator drain and drain coolant.
- Drain engine oil using a metric socket set 8mm-19mm (use the correct drain plug socket).
Step 2: Remove the right front wheel and splash shield
- Remove the wheel using a metric socket set 8mm-19mm.
- Remove the inner fender/splash shield fasteners with a flat trim tool and Phillips screwdriver #2.
Step 3: Remove the serpentine belt
- Rotate the belt tensioner with a serpentine belt tool 14mm, then slip the belt off.
- Tip: Take a photo of belt routing.
Step 4: Support the engine and remove the right engine mount
- Support the engine using an engine support bar (specialty) or a hydraulic jack with wood block under the oil pan (do not crush the pan).
- Remove the mount and bracket fasteners with a metric socket set 8mm-19mm and metric combination wrench set 8mm-19mm.
- Torque to Nissan service manual specification on reassembly.
Step 5: Remove the valve cover
- Disconnect any hoses/connectors as needed using needle-nose pliers and a flat trim tool.
- Remove valve cover fasteners using a metric socket set 8mm-19mm.
- Lift the cover off carefully; clean gasket surfaces with a plastic scraper.
- Torque to Nissan service manual specification on reassembly.
Step 6: Set the engine to Top Dead Center (TDC) on cylinder 1
- Turn the crankshaft clockwise using a breaker bar and the correct socket from the metric socket set 8mm-19mm.
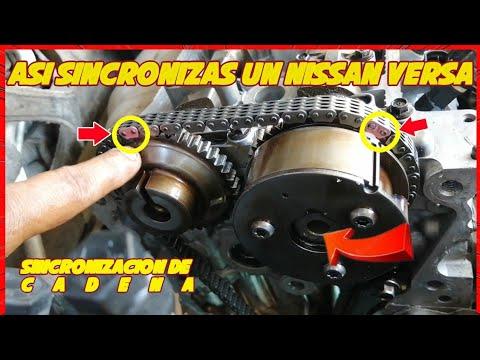
- Align the timing marks per the chain’s colored links and sprocket marks.
- Tip: Paint-mark the chain and sprockets.
Step 7: Remove the crankshaft pulley
- Hold the pulley with a crank pulley holding tool (specialty).
- Loosen the crank bolt using a 1/2" drive breaker bar.
- Remove the pulley using a crankshaft pulley puller (specialty).
- Torque to Nissan service manual specification (and angle, if specified) on reassembly using a torque wrench and torque angle gauge.
Step 8: Remove the front timing cover
- Remove timing cover bolts using a metric socket set 8mm-19mm.
- Carefully separate the cover; use a plastic scraper and do not gouge aluminum sealing surfaces.
- Clean all mating surfaces using a razor scraper (lightly) and brake cleaner spray.
Step 9: Replace the timing chain, guides, and tensioner
- Remove the chain tensioner and guides using a metric socket set 8mm-19mm.
- Install the new guides and new tensioner from the timing chain kit.
- Install the new chain so the colored links align with the crank and cam sprocket timing marks.
- Release/activate the tensioner per the kit design.
- Torque to Nissan service manual specification for guide and tensioner fasteners.
Step 10: Replace the crank front seal and reseal the timing cover
- Replace the crankshaft front oil seal in the timing cover.
- Apply front timing cover sealant (RTV silicone) in a continuous bead where required.
- Install the timing cover and tighten bolts evenly using a torque wrench.
- Torque to Nissan service manual specification.
- Tip: Keep RTV bead unbroken at corners.
Step 11: Reassemble components
- Reinstall the crank pulley and crank bolt using a crank pulley holding tool (specialty), torque wrench, and torque angle gauge.
- Reinstall the engine mount using a metric socket set 8mm-19mm.
- Install the valve cover with a new valve cover gasket using a metric socket set 8mm-19mm.
- Install the new serpentine belt using a serpentine belt tool 14mm.
- Reinstall the splash shield and wheel using a Phillips screwdriver #2, flat trim tool, and metric socket set 8mm-19mm.
- Torque to Nissan service manual specification for all critical fasteners.
Step 12: Refill fluids
- Refill engine oil (and replace the oil filter) using a funnel.
- Refill coolant using a funnel, then bleed air as needed while monitoring temperature.
✅ After Repair
- Start the engine and listen for abnormal rattles from the timing cover area.
- Check for oil leaks around the timing cover and crank seal area.
- Check for coolant leaks and confirm the heater blows hot (sign coolant is circulating).
- Use an OBD2 scan tool to check/clear any stored codes.
- Recheck oil and coolant levels after the first full heat cycle.
💰 DIY vs Shop Cost
Shop Cost: ₹30,000-₹65,000 (parts + labor)
DIY Cost: ₹9,000-₹22,000 (parts only)
You Save: ₹21,000-₹43,000 by doing it yourself!
Shop labor rates vary but typically run ₹800-₹2,000/hour. This repair takes a shop approximately 6-10 hours.
🎯 Ready to get started?
HowToo makes it easy: same-day/2-day shipping on every part, plus all the tools and specialty tools you need! Check out the parts and tools sections below to add everything to your cart.