


2016 GMC Yukon Power Steering Pump Issue? How to Replace the EPS Steering Gear (No Pump)
Step-by-step electric power steering rack/gear replacement with tools, parts, safety tips, calibration, and alignment notes
2016 GMC Yukon Power Steering Pump Issue? How to Replace the EPS Steering Gear (No Pump)
Step-by-step electric power steering rack/gear replacement with tools, parts, safety tips, calibration, and alignment notes


🔧 Yukon - Electric Power Steering Gear Replacement
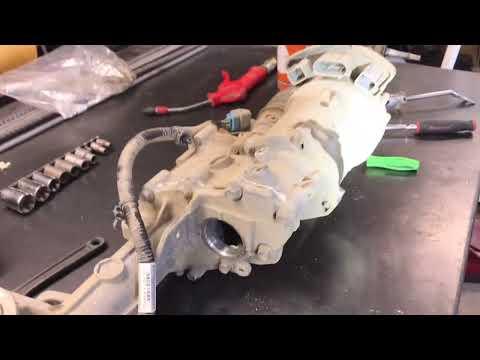
Your Yukon Denali uses electric power steering (EPS), so it does not have a hydraulic power steering pump or power steering fluid to replace. If you’re trying to fix a “power steering pump” problem, the closest equivalent repair is replacing the EPS steering gear (rack/gear assembly with electric motor) under the front of the SUV.
Assumption: You meant replacing the EPS steering gear assembly (since no pump exists on your Yukon).
Difficulty Level: Advanced | Estimated Time: 4-7 hours
⚠️ Safety & Precautions
- 🛑 Disconnect the negative battery cable and wait 2+ minutes before working near steering components (airbag/SIR system protection).
- 🛑 Keep the steering wheel centered and locked. Do not let it spin with the intermediate shaft disconnected or you can damage the clock spring (the ribbon coil that carries airbag/wheel controls).
- 🛑 Support the SUV with jack stands on a level surface; never rely on a jack.
- 🛑 After replacement, the Yukon typically needs a steering angle sensor/EPS calibration with a scan tool and a front-end alignment.
🔧 Required Tools
You'll need the following tools for this repair:
- Floor jack (rated 3-ton minimum)
- Jack stands (rated 3-ton minimum)
- Wheel chocks
- Safety glasses
- Mechanic gloves
- Breaker bar 1/2"
- Torque wrench 3/8"
- Torque wrench 1/2"
- Socket set metric 8mm–24mm
- Wrench set metric 8mm–24mm
- Torx bit set
- Pry bar
- Needle-nose pliers
- Trim clip removal tool
- Tie-rod end puller (specialty)
- Pitman/ball joint separator fork (specialty)
- Paint marker
- Scan tool with GM EPS functions (specialty)
🔩 Required Parts
HowToo sells all the parts you need for this repair:
- Electric power steering gear assembly - Qty: 1
- Steering intermediate shaft pinch bolt - Qty: 1
- Outer tie rod ends - Replace in pairs - Qty: 2
- Front subframe/steering gear mounting bolts - Qty: 1 set
- New cotter pins - Qty: 2
📋 Before You Begin
- Park on level ground, set the parking brake, and place wheel chocks behind the rear tires.
- Center the steering wheel and keep it centered (use a seat belt looped through the wheel if needed).
- Disconnect the battery using a 10mm socket on the negative terminal, then wait 2+ minutes.
- Plan for an alignment: mark tie-rod positions, but still get a professional alignment afterward.
🔨 Step-by-Step Instructions
Follow these steps in order:
Step 1: Raise and secure the front
- Use a floor jack to lift the front of the Yukon at the proper lift point.
- Set it down on jack stands and verify stability before going underneath.
- Remove both front wheels using a 22mm socket (typical lug size) and a breaker bar.
Step 2: Remove splash shields/skid plates (as equipped)
- Remove underbody panels using a socket set and trim clip removal tool.
- Keep fasteners grouped by panel. Phone photo helps reassembly.
Step 3: Unplug EPS electrical connectors
- Locate the EPS steering gear and unplug the electrical connector(s) using needle-nose pliers only if needed for the lock tab.
- Do not pull on wires—pull on the connector body by hand.
Step 4: Disconnect the outer tie rod ends from the knuckles
- Remove the cotter pins using needle-nose pliers.
- Remove the tie rod end nuts using the correct-size socket.
- Separate the tie rod ends from the steering knuckles using a tie-rod end puller (specialty).
- Mark the tie rod jam nut position with a paint marker to preserve toe roughly.
Step 5: Disconnect the steering intermediate shaft from the gear
- Make alignment marks across the shaft-to-gear input using a paint marker.
- Remove the intermediate shaft pinch bolt using a socket set.
- Slide the shaft off the gear input using hand pressure and a pry bar only if needed.
- Important: Do not rotate the steering wheel with the shaft disconnected.
- Torque to OEM specification when installing the new pinch bolt.
Step 6: Remove the steering gear mounting bolts
- Support the steering gear by hand while removing bolts.
- Remove steering gear mounting fasteners using a socket set and breaker bar.
- Torque to OEM specification on reinstallation (mounting bolts are commonly torque-to-yield; replace if required).
Step 7: Remove the EPS steering gear from the vehicle
- Work the steering gear out carefully, watching wiring and boots.
- If it hangs up, re-check that the intermediate shaft is fully free and tie rods are separated.
Step 8: Install the new EPS steering gear
- Position the new steering gear into place by hand.
- Start mounting bolts by hand to avoid cross-threading, then tighten using a socket set.
- Torque to OEM specification with a torque wrench 1/2".
Step 9: Reconnect the intermediate shaft
- Align your paint marks and slide the shaft onto the input.
- Install a new pinch bolt using a socket set.
- Torque to OEM specification with a torque wrench.
Step 10: Reinstall tie rod ends
- Reconnect tie rod ends to the knuckles and install nuts using a socket set.
- Install new cotter pins using needle-nose pliers.
- Snug jam nuts using a wrench set to your paint-mark position (temporary until alignment).
- Torque to OEM specification on tie rod end nuts and jam nuts.
Step 11: Plug in EPS connectors and reinstall shields
- Reconnect EPS electrical connectors by hand until the lock clicks.
- Reinstall splash shields/skid plates using a socket set and trim clip removal tool.
Step 12: Reinstall wheels and lower the vehicle
- Install wheels and hand-thread lug nuts.
- Lower the Yukon using the floor jack.
- Tighten lug nuts in a star pattern using a torque wrench 1/2" to OEM specification.
✅ After Repair
- Reconnect the battery using a 10mm socket.
- Turn the ignition on and verify no binding while turning the wheel lock-to-lock gently.
- Use a scan tool with GM EPS functions (specialty) to perform EPS setup as required (commonly steering angle sensor centering/calibration).
- Get a professional wheel alignment as soon as possible.
- Test drive at low speed first; confirm no warning lights for steering/StabiliTrak.
💰 DIY vs Shop Cost
Shop Cost: $1,500-$3,200 (parts + labor)
DIY Cost: $900-$2,400 (parts only)
You Save: $600-$800 by doing it yourself!
Shop labor rates vary but typically run $100-$150/hour. This repair takes a shop approximately 4-7 hours.
🎯 Ready to get started?
HowToo makes it easy: same-day/2-day shipping on every part, plus all the tools and specialty tools you need! Check out the parts and tools sections below to add everything to your cart.
