


2015 Honda Civic EPS Troubleshooting Guide (No Power Steering Pump): Fix Heavy Steering
Step-by-step checks for EPS warning light, battery/charging voltage, fuses, codes, and rack issues
2015 Honda Civic EPS Troubleshooting Guide (No Power Steering Pump): Fix Heavy Steering
Step-by-step checks for EPS warning light, battery/charging voltage, fuses, codes, and rack issues


🔧 Civic - Electric Power Steering (EPS) Assist Repair (No Pump)
Your Civic uses Electric Power Steering (EPS), so it does not have a hydraulic power steering pump or power steering fluid to replace. If the steering is heavy, the fix is usually electrical (battery/charging, fuses, wiring) or the EPS steering rack/assist unit.
Difficulty Level: Beginner (checks) / Advanced (EPS rack replacement) | Estimated Time: 0.5-1.5 hours (checks) / 4-7 hours (rack)
⚠️ Safety & Precautions
- ⚠️ If you work near airbags/steering column wiring, disconnect the battery first to reduce accidental airbag deployment risk.
- ⚠️ Support the car with jack stands if you lift it; never rely on a floor jack alone.
- ⚠️ Keep the steering wheel centered; avoid spinning it freely if the steering shaft is disconnected (can damage the cable reel/clock spring).
- ⚠️ After any steering/suspension work, a professional alignment is required.
🔧 Required Tools
You'll need the following tools for this repair:
- Safety glasses
- Mechanic gloves
- Flashlight
- 10mm wrench
- 10mm socket
- Ratchet
- Digital multimeter
- OBD2 scan tool with Honda EPS code access (specialty)
- Trim removal tool
- Floor jack (rated 3-ton minimum)
- Jack stands (rated 3-ton minimum)
- Wheel chocks
🔩 Required Parts
HowToo sells all the parts you need for this repair:
- EPS fuse(s) (as needed) - Qty: 1
- 12V battery (as needed) - Qty: 1
- Battery terminal cleaning kit (as needed) - Qty: 1
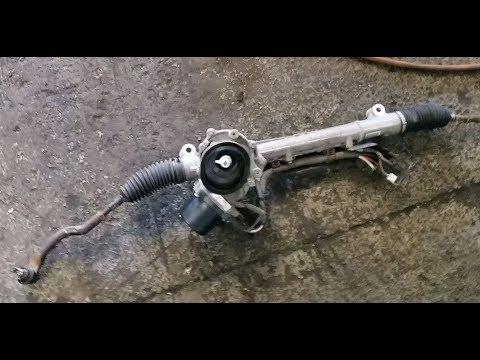
- EPS steering gear assembly (electric rack) (if diagnosed failed) - Qty: 1
📋 Before You Begin
- Park on level ground, shift to Park, and set the parking brake.
- Center the steering wheel and keep it centered during checks.
- If you’ll unplug EPS connectors: use a 10mm wrench to disconnect the negative battery terminal and wait at least 3 minutes before touching steering/airbag-area connectors.
- EPS is sensitive to low battery voltage.
🔨 Step-by-Step Instructions
Follow these steps in order:
Step 1: Confirm it’s EPS (no pump/fluid)
- Open the hood and look for a power steering fluid reservoir—your Civic will not have one because assist is electric.
- If you were chasing a “pump whining” noise, note that common look-alikes are the alternator, A/C compressor, or a worn belt-driven accessory (even though there’s no steering pump).
Step 2: Check the dash for the EPS warning light
- Turn the key ON (engine OFF) and look for a steering wheel/EPS warning light.
- If the EPS light stays on, the system likely stored a fault code.
Step 3: Scan for EPS codes (best first “real” step)
- Plug in an OBD2 scan tool with Honda EPS code access (specialty). This means the scanner can read power steering module codes, not just generic engine codes.
- Record any EPS/PS-related codes and freeze-frame info.
- Clear codes only after repairs; clearing first can erase helpful clues.
Step 4: Test battery voltage (low voltage is a top cause)
- Use a digital multimeter at the battery posts.
- Engine OFF: you want roughly 12.4–12.7V on a healthy, charged battery.
- Engine RUNNING: you typically want about 13.5–14.8V (alternator charging).
- If voltage is low or fluctuating, fix the battery/charging issue first—EPS may shut off to protect itself.
Step 5: Inspect and clean battery terminals and grounds
- Use a 10mm wrench to loosen and remove battery terminals (negative first).
- Clean corrosion using the battery terminal cleaning kit, then reinstall (positive first, negative last).
- Visually inspect the main ground cable for looseness or damage.
Step 6: Check EPS-related fuses
- Use a trim removal tool to open fuse box covers (as needed).
- Use your flashlight and inspect the EPS/PS-labeled fuses in the under-hood and interior fuse panels.
- If a fuse is blown, replace it with the same amperage rating (do not up-size).
- If it blows again, stop—there’s likely a short circuit that needs proper diagnosis.
Step 7: If codes point to the EPS steering rack/torque sensor
- At this point, the repair is often steering-gear (rack) related, which is an advanced job and usually requires an alignment and sometimes scan-tool calibration.
- If you’re set on DIY: plan for lifting the car with a floor jack, supporting with jack stands, and carefully disconnecting steering/suspension connections.
- Torque specs and calibration vary; follow Honda service information exactly.
✅ After Repair
- Clear EPS codes with the OBD2 scan tool with Honda EPS code access (specialty) and re-check for returning codes.
- Road test in a safe area: verify the steering assist feels normal and the EPS light stays off.
- If the steering rack or tie rods were replaced/loosened: get a 4-wheel alignment immediately.
💰 DIY vs Shop Cost
Shop Cost: $150-$300 (diagnosis) / $1,200-$2,200 (EPS rack replacement + alignment)
DIY Cost: $10-$250 (fuse/terminal service/battery) / $600-$1,200 (rack, if needed, parts only)
You Save: $140-$1,000+ by doing it yourself!
Shop labor rates vary but typically run $100-$150/hour. This repair takes a shop approximately 0.5-1.5 hours to diagnose or 4-7 hours for rack replacement.
🎯 Ready to get started?
HowToo makes it easy: same-day/2-day shipping on every part, plus all the tools and specialty tools you need! Check out the parts and tools sections below to add everything to your cart.