


2006-2010 Honda Civic Timing Chain Replacement Guide (1.8L) — Fix Cold-Start Rattle & Codes (Engine: Inline 4 1.8L)
Step-by-step inspection and replacement overview with required tools, parts list, torque specs, and safety tips
2006-2010 Honda Civic Timing Chain Replacement Guide (1.8L) — Fix Cold-Start Rattle & Codes (Engine: Inline 4 1.8L)
Step-by-step inspection and replacement overview with required tools, parts list, torque specs, and safety tips for 2006, 2007, 2008, 2009, 2010
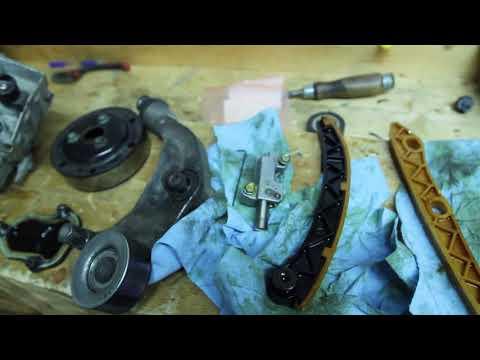
🔧 Civic - Timing Belt Replacement (Correction: Timing Chain)
Your Civic’s 1.8L engine does not use a timing belt—it uses a timing chain. A chain is inside the engine and is typically not a routine maintenance item unless there are symptoms (cold-start rattle, cam/crank correlation codes, or confirmed chain stretch).
Difficulty Level: Intermediate (inspection) / Advanced (chain replacement) | Estimated Time: 1-2 hours (inspection) / 8-12 hours (replacement)
⚠️ Safety & Precautions
- 🧤 Work on a cold engine to avoid burns.
- 🧯 Keep loose clothing/hair away from the accessory belt area.
- 🔋 Disconnect the negative battery terminal if removing the valve cover or any electrical connectors.
- 🧰 If doing a timing chain job, the engine mount comes off and the engine must be supported safely.
🔧 Required Tools
You'll need the following tools for this repair:
- 10mm socket
- 12mm socket
- 14mm socket
- 3/8" drive ratchet
- 3/8" drive torque wrench (5-80 Nm range)
- Socket extensions (3" and 6")
- Flat trim tool
- Pick tool
- Fender cover
- Brake cleaner spray
- Shop rags
- Nitrile gloves
- Safety glasses
- Floor jack (rated 2-ton minimum)
- Jack stands (rated 2-ton minimum)
- Wheel chocks
- Engine support bar (specialty)
- Harmonic balancer puller kit (specialty)
🔩 Required Parts
HowToo sells all the parts you need for this repair:
- Valve cover gasket set - Qty: 1
- High-temp RTV silicone sealant - Qty: 1
- Engine oil (5W-20) - Qty: 4 quarts
- Oil filter - Qty: 1
- Timing chain kit (chain + guides + tensioner) - Qty: 1
- Front crankshaft seal - Qty: 1
- Front timing cover sealant (Honda-style RTV) - Qty: 1
- Accessory drive belt - Qty: 1
- Coolant (Honda-type blue) - Qty: 1 gallon
📋 Before You Begin
- Park on level ground, set the parking brake, and chock the rear wheels.
- Let the engine cool completely.
- If you’ll remove the valve cover: disconnect the negative battery terminal using a 10mm socket.
- Two quick questions so I can give you the correct path:
- Are you trying to fix a symptom (cold-start rattle or a check-engine light), or are you doing preventative maintenance?
- Do you want inspection only (recommended first), or a full timing chain replacement?
🔨 Step-by-Step Instructions
Follow these steps in order:
Step 1: Do a quick “belt vs chain” confirmation
- Remove the oil fill cap by hand.
- Use a flashlight and look inside—on your Civic you’ll see metal timing components (chain area), not a belt cover service access.
- If you hear rattling, record a cold-start video.
Step 2: Listen for classic timing chain/tensioner noise
- Start the engine cold.
- Listen near the passenger side of the engine for a brief rattle (1–3 seconds) that goes away.
- If present, shut the engine off and plan for inspection—low oil level or a weak tensioner can cause this.
Step 3: Check oil level and condition (important for chains)
- Use the dipstick to confirm oil level is correct.
- If oil is low/dirty, plan an oil change (dirty oil accelerates chain wear).
Step 4: Valve cover removal (inspection access)
- Disconnect the negative battery terminal using a 10mm socket.
- Remove any interfering plastic covers/clips using a flat trim tool.
- Unplug ignition coil connectors and remove coil bolts using a 10mm socket, then lift coils out.
- Remove valve cover fasteners using a 10mm socket, then lift the cover off gently.
- Clean the gasket surfaces using shop rags and a light spray of brake cleaner spray.
- When reinstalling the valve cover fasteners: Torque to 10 Nm (7 ft-lbs).
Step 5: What you can verify with the cover off
- Check for heavy sludge buildup (a clue of poor oil maintenance).
- Look for abnormal wear marks or broken plastic pieces (guide material).
- If you find broken guide pieces or severe sludge, a full chain service is justified.
Step 6: Reassemble after inspection
- Install a new valve cover gasket (recommended once removed).
- Apply a small dab of RTV silicone sealant at the timing cover-to-cylinder head seam points before installing the cover.
- Reinstall ignition coils using a 10mm socket and reconnect connectors.
- Reconnect the battery terminal using a 10mm socket.
Step 7: If you truly need timing chain replacement
- This is an advanced job because the engine mount and front cover come off and the engine must be supported.
- Reply with your answers to the two questions above, and I’ll give you the exact step-by-step path for your Civic (including what comes off first, alignment checks, and the parts list you’ll actually need).
✅ After Repair
- Start the engine and confirm there are no oil leaks around the valve cover.
- Let it idle for 2–3 minutes and listen for abnormal rattling.
- Recheck engine oil level after a short drive.
- If you had a check-engine light, have the codes scanned and confirm they don’t return.
💰 DIY vs Shop Cost
Shop Cost: $250-$450 (inspection/valve cover reseal) or $1,200-$2,200 (timing chain job)
DIY Cost: $25-$90 (inspection parts/consumables) or $250-$550 (timing chain parts)
You Save: $200-$1,700 by doing it yourself!
Shop labor rates vary but typically run $100-$150/hour. This repair takes a shop approximately 1-2 hours (inspection) or 8-12 hours (chain).
🎯 Ready to get started?
HowToo makes it easy: same-day/2-day shipping on every part, plus all the tools and specialty tools you need! Check out the parts and tools sections below to add everything to your cart.
Guide for Engine Timing Chain Kit replace for these Honda vehicles
| Year Make Model | Sub Model | Engine | Body Style |
|---|---|---|---|
| 2010 Honda Civic | - | Inline 4 1.8L | - |
| 2010 Honda Civic | - | Inline 4 1.3L | - |
| 2010 Honda Civic | - | Inline 4 2.0L | - |
| 2009 Honda Civic | - | Inline 4 1.8L | - |
| 2009 Honda Civic | - | Inline 4 1.3L | - |
| 2009 Honda Civic | - | Inline 4 2.0L | - |
| 2008 Honda Civic | - | Inline 4 1.8L | - |
| 2008 Honda Civic | - | Inline 4 1.3L | - |
| 2008 Honda Civic | - | Inline 4 2.0L | - |
| 2007 Honda Civic | - | Inline 4 1.8L | - |
| 2007 Honda Civic | - | Inline 4 1.3L | - |
| 2007 Honda Civic | - | Inline 4 2.0L | - |
| 2006 Honda Civic | - | Inline 4 1.8L | - |
| 2006 Honda Civic | - | Inline 4 1.3L | - |
| 2006 Honda Civic | - | Inline 4 2.0L | - |
